Samsung SC-D372 User Manual (ENGLISH) - Page 23
Initial Setting : System Menu Setting, Ajuste inicial: ajuste del menú Sistema - manual
 |
UPC - 036725301689
View all Samsung SC-D372 manuals
Add to My Manuals
Save this manual to your list of manuals |
Page 23 highlights
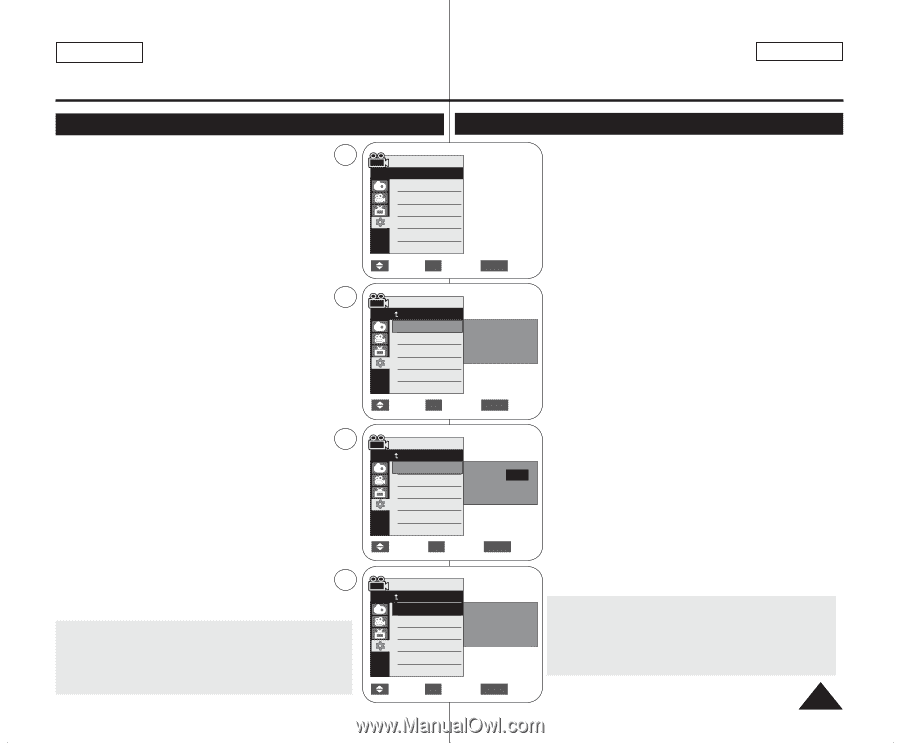
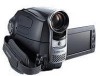
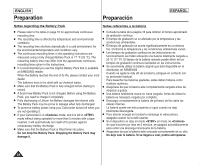
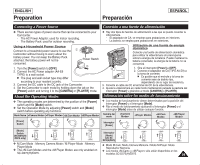
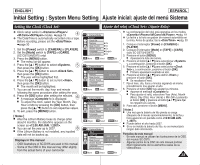
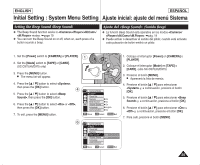
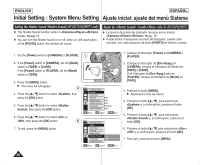
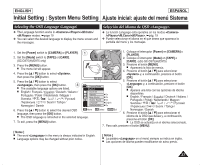
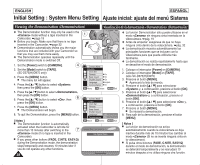
ENGLISH ESPAÑOL Initial Setting : System Menu Setting Ajuste inicial: ajuste del menú Sistema Setting the Clock (Clock Set) ✤ Clock setup works in // / modes. ➥page 19 4 ✤ The Date/Time is automatically recorded onto a tape. Before recording, please set the . ➥page 30 1. Set the [Power] switch to [CAMERA] or [PLAYER]. 2. Set the [Mode] switch to [TAPE] or [CARD]. (SC-D375(H)/D975 only) 3. Press the [MENU] button. I The menu list will appear. 4. Press the [L / M] button to select , 5 then press the [OK] button. 5. Press the [L / M] button to select , then press the [OK] button. I The year will be highlighted first. 6. Press the [L / M] button to set current , then press the [OK] button. I The month will be highlighted. 7. You can set the month, day, hour and minute following the same procedure after setting the year. 8. Press the [OK] button after setting the minutes. I A message is displayed. 6 I To adjust the clock, select the Year, Month, Day, Hour or Min by pressing the [OK] button, then press the [L / M] button to set respective values. 9. To exit, press the [MENU] button. [ Notes ] I After the Lithium Battery loses its charge (after about 6 months), the date/time appears on the screen as . I You can set the year up to 2037. 8 I If the Lithium Battery is not installed, any inputted data will not be backed up. Displays in this manual - OSD illustrations of SC-D375 are used in this manual. - Some of the OSD in this manual may differ slightly from the actual items of your camcorder. Ajuste del reloj (Ajuste Reloj) Camera Mode √System Clock Set Remote Beep Sound Shutter Sound Language Demonstration √On √On √On √English √On Move OK Select MENU Exit Camera Mode Back Clock Set Remote Beep Sound Shutter Sound Language Demonstration Move OK Select Set Time MENU Exit Camera Mode Back Clock Set Remote Beep Sound Shutter Sound Language Demonstration ... JAN 1 2007 † 12 : 00 AM Adjust OK Select MENU Exit Camera Mode Back Clock Set Remote Beep Sound Shutter Sound Language Demonstration JAN 1 2007 12 : 00 AM Complete ! ✤ La configuración del reloj está operativa en los modos ///. ➥pág. 19 ✤ La fecha y la hora se graban de manera automática en la cinta. Antes de grabar, fije la . ➥pág. 30 1. Coloque el interruptor [Power] en [CAMERA] o [PLAYER]. 2. Coloque el interruptor [Mode] en [TAPE] o [CARD]. (sólo SC-D375(H)/D975) 3. Presione el botón [MENU]. I Aparecerá la lista de menús. 4. Presione el botón [L / M] para seleccionar y, a continuación, presione el botón [OK]. 5. Presione el botón [L / M] para seleccionar y, a continuación, presione el botón [OK]. I Primero aparecerá resaltado el año. 6. Presione el botón [L / M] para definir y presione el botón [OK]. I Se resaltará el mes. 7. Fije el mes, día, hora y minutos siguiendo el mismo procedimiento tras ajustar el año. 8. Presione el botón [OK] tras ajustar los minutos. I Aparece el mensaje . I Para ajustar el reloj, seleccione Year (Año), Month (Mes), Day (Día), Hour (Hora) o Min (Min.) pulsando el botón [OK] y presione el botón [L / M] para fijar los respectivos valores. 9. Para salir, presione el botón [MENU]. [ Notas ] I Una vez que la batería de litio pierda su carga (después de 6 meses aproximadamente), la fecha y hora aparecen en pantalla como . I Puede definir el año hasta 2037. I Si no se instala la batería de litio, no se memorizará ningún dato introducido. Pantallas de este manual - En este manual se utilizan las ilustraciones de la OSD del modelo SC-D375. - Algunas partes de la OSD de este manual podrían diferir ligeramente de los elementos reales de su videocámara. Move OK Select MENU Exit 23
-
 1
1 -
2
-
3
-
4
-
5
-
6
-
7
-
8
-
9
-
10
-
11
-
12
-
13
-
14
-
15
-
16
-
17
-
 18
18 -
 19
19 -
 20
20 -
 21
21 -
 22
22 -
 23
23 -
 24
24 -
 25
25 -
 26
26 -
 27
27 -
 28
28 -
29
-
30
-
31
-
32
-
33
-
34
-
35
-
36
-
37
-
38
-
39
-
40
-
41
-
42
-
43
-
44
-
45
-
46
-
47
-
48
-
49
-
50
-
51
-
52
-
53
-
54
-
55
-
56
-
57
-
58
-
59
-
60
-
61
-
62
-
63
-
64
-
65
-
66
-
67
-
68
-
69
-
70
-
71
-
72
-
73
-
74
-
75
-
76
-
77
-
78
-
79
-
80
-
81
-
82
-
83
-
84
-
85
-
86
-
87
-
88
-
89
-
90
-
91
-
92
-
93
-
94
-
95
-
96
-
97
-
98
-
99
-
100
-
101
-
102
-
103
-
104
-
105
-
106
-
107
-
108
-
109
-
110
 |
 |