Samsung SCDC164 User Manual (ENGLISH) - Page 30
Initial Setting: System Menu Setting
 |
UPC - 036725301528
View all Samsung SCDC164 manuals
Add to My Manuals
Save this manual to your list of manuals |
Page 30 highlights
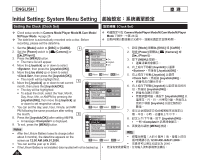
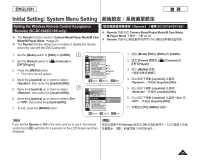
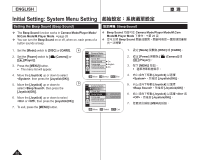
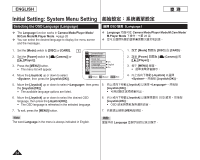
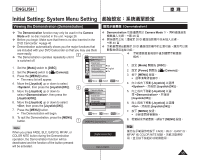
ENGLISH 臺 灣 Initial Setting: System Menu Setting Setting the Clock (Clock Set) Clock Set) Clock setup works in Camera Mode/Player Mode/M.Cam Mode/ M.Player Mode. page 26 The date/time is automatically recorded onto a disc. Before recording, please set the date/time. Camera Mode/Player Mode/M.Cam Mode/M.Player Mode 26 頁 1. Set the [Mode] switch to [DISC] or [CARD]. 4 1. 設定 [Mode DISC] 或 [CARD]。 2. Set the [Power] switch to [ (Camera)] or [ (Player)]. 3. Press the [MENU] button. The menu list will appear. 4. Move the [Joystick] up or down to select , then press the [Joystick(OK)]. 5. Move the [Joy stick] up or down to select , then press the [Joystick(OK)]. The month will be highlight first. 6. Move the [Joystick] up or down to set current 5 month, then press the [Joystick(OK)]. Camera Mode ►System Clock Set Beep Sound ►On Language ►English Demonstration ►On Move OK Select MENU Exit Camera Mode ►System 2. 設定 [Power Camera)] 或 [ (Player)]。 3. 按下 [MENU 4 Joystick System Joystick(OK)]。 5 Joystick Clock Set Joystick(OK 6 Joystick The day will be highlighted. To adjust the clock, select the Year, Month, Day, Hour, Min, or AM/PM by pressing the [Joystick(OK)], then move the [Joystick] up Clock Set Beep Sound Language Demonstration JAN 01 2006 12 : 00 AM Joystick(OK Joystick(OK)] 以 or down to set respective values. Joystick 7. You can set the day, year, hour, minute, and AM/ Adjust OK Select MENU Exit 數值。 PM following the same procedure after setting 7 the month. 8 8. Press the [Joystick(OK)] after setting AM/PM. A message is displayed. 9. To exit, press the [MENU] button. Notes After the Lithium Battery loses its charge (after Camera Mode ►System Clock Set Beep Sound Language Demonstration JAN 01 2006 12 : 00 AM Complete! 8 Joystick(OK Complete 9 MENU] 按鈕。 附註 about 6 months), the date/time appears on the 6 screen as 12:00 AM JAN.01.2006. Move OK Select MENU Exit 12:00 AM JAN.01.2006。 You can set the year up to 2040. 2040。 If the Lithium Battery is not installed, data inputted will not be backed up 30
-
 1
1 -
2
-
3
-
4
-
5
-
6
-
7
-
8
-
9
-
10
-
11
-
12
-
13
-
14
-
15
-
16
-
17
-
18
-
19
-
20
-
21
-
22
-
23
-
24
-
 25
25 -
 26
26 -
 27
27 -
 28
28 -
 29
29 -
 30
30 -
 31
31 -
 32
32 -
 33
33 -
 34
34 -
 35
35 -
36
-
37
-
38
-
39
-
40
-
41
-
42
-
43
-
44
-
45
-
46
-
47
-
48
-
49
-
50
-
51
-
52
-
53
-
54
-
55
-
56
-
57
-
58
-
59
-
60
-
61
-
62
-
63
-
64
-
65
-
66
-
67
-
68
-
69
-
70
-
71
-
72
-
73
-
74
-
75
-
76
-
77
-
78
-
79
-
80
-
81
-
82
-
83
-
84
-
85
-
86
-
87
-
88
-
89
-
90
-
91
-
92
-
93
-
94
-
95
-
96
-
97
-
98
-
99
-
100
-
101
-
102
-
103
-
104
-
105
-
106
-
107
-
108
-
109
-
110
-
111
-
112
-
113
-
114
-
115
-
116
-
117
-
118
-
119
-
120
-
121
-
122
-
123
-
124
-
125
-
126
-
127
-
128
 |
 |
