Samsung SMO-152QN User Guide - Page 39
Setting each item function at SETUP
 |
UPC - 036725120181
View all Samsung SMO-152QN manuals
Add to My Manuals
Save this manual to your list of manuals |
Page 39 highlights
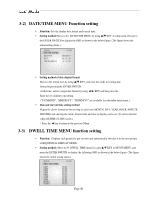
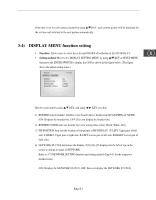
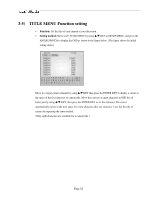
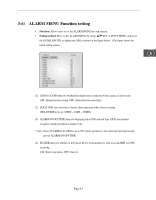
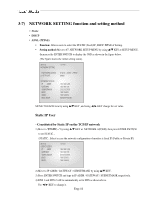
Chapter 3: Setting each item function at SETUP MENU Pressing the MENU BUTTON of the FRONT PANEL allows users to enter SETUP MENU and see the following menu OSD box. Setting method of each SETUP MENU function and operation is as follows. 06/01/03 13:14:00 SETUP MENU 1. ADJUST VER 1.00_45 E 2. DATE/TIME 3. DWELL TIME 4. DISPLAY 5. TITLE 6. ALARM 7. NETWORK SETUP 8. VIEW EVENT LOG 9. SYSTEM SETUP 3-1) ADJUST MENU function and setting method • Function: Allows adjustment to the display status • Setting method: Move to #1. ADJUST MENU by using L/M KEY and press the ENTER SWITCH to display the OSD as shown in the figure below. (The figure shows the initial setting status.) 06/01/03 ADJUST SETTING CONTRAST BRIGHT COLOR SHARPNESS TINT 13:14:00 50 50 50 50 50 Move to a target item by using L/M KEY. Enter the item by pressing the ➛ENTER❿ SWITCH. At this time, set a target value by using L/MKEY. You can move to another item by using L/M KEY after setting the target value. (1) CONTRAST : Adjusts light and shade of screen (2) BRIGHT : Adjusts lightness of entire screen (3) COLOR : Adjusts color density (4) TINT : Adjusts color sense (5) SHARPNESS : Adjusts contour of screen Eng-39
-
 1
1 -
2
-
3
-
4
-
5
-
6
-
7
-
8
-
9
-
10
-
11
-
12
-
13
-
14
-
15
-
16
-
17
-
18
-
19
-
20
-
21
-
22
-
23
-
24
-
25
-
26
-
27
-
28
-
29
-
30
-
31
-
32
-
33
-
 34
34 -
 35
35 -
 36
36 -
 37
37 -
 38
38 -
 39
39 -
 40
40 -
 41
41 -
 42
42 -
 43
43 -
 44
44 -
45
-
46
-
47
-
48
-
49
-
50
-
51
-
52
-
53
-
54
-
55
-
56
-
57
-
58
-
59
-
60
-
61
-
62
-
63
-
64
-
65
-
66
-
67
-
68
-
69
-
70
-
71
-
72
-
73
-
74
-
75
-
76
-
77
-
78
-
79
-
80
-
81
-
82
-
83
-
84
-
85
-
86
-
87
-
88
-
89
-
90
-
91
-
92
-
93
-
94
-
95
-
96
-
97
-
98
-
99
-
100
-
101
-
102
-
103
-
104
-
105
-
106
-
107
-
108
-
109
-
110
-
111
-
112
-
113
-
114
-
115
-
116
-
117
-
118
-
119
-
120
-
121
-
122
-
123
-
124
-
125
-
126
-
127
-
128
-
129
-
130
-
131
-
132
-
133
-
134
-
135
-
136
-
137
-
138
-
139
-
140
-
141
-
142
-
143
-
144
-
145
-
146
-
147
-
148
-
149
-
150
-
151
-
152
-
153
-
154
-
155
-
156
-
157
-
158
-
159
-
160
-
161
-
162
-
163
-
164
-
165
-
166
-
167
-
168
-
169
-
170
-
171
-
172
-
173
-
174
-
175
-
176
-
177
-
178
-
179
-
180
-
181
-
182
-
183
-
184
-
185
-
186
-
187
-
188
-
189
-
190
-
191
-
192
-
193
-
194
-
195
-
196
-
197
-
198
-
199
-
200
-
201
-
202
-
203
-
204
-
205
-
206
-
207
-
208
-
209
-
210
-
211
-
212
-
213
-
214
-
215
-
216
-
217
-
218
-
219
-
220
-
221
-
222
-
223
-
224
-
225
-
226
-
227
-
228
-
229
-
230
-
231
-
232
-
233
-
234
-
235
-
236
-
237
-
238
-
239
-
240
-
241
-
242
-
243
-
244
-
245
-
246
-
247
-
248
-
249
-
250
-
251
-
252
-
253
-
254
-
255
-
256
-
257
-
258
-
259
-
260
-
261
-
262
-
263
-
264
-
265
-
266
-
267
-
268
-
269
-
270
-
271
-
272
-
273
-
274
-
275
-
276
-
277
-
278
-
279
-
280
-
281
-
282
-
283
-
284
-
285
-
286
-
287
-
288
-
289
-
290
-
291
-
292
-
293
-
294
-
295
-
296
-
297
-
298
-
299
-
300
-
301
-
302
-
303
-
304
-
305
-
306
-
307
-
308
-
309
-
310
-
311
-
312
-
313
-
314
-
315
 |
 |