Samsung SPH-M580 User Manual (user Manual) (ver.f12) (English) - Page 105
Adding a Number to a Contacts Entry, Editing a Contacts Entry’s Number, Selecting a Ringer Type
 |
View all Samsung SPH-M580 manuals
Add to My Manuals
Save this manual to your list of manuals |
Page 105 highlights
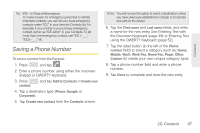
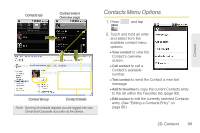
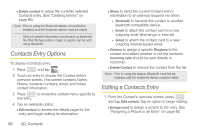
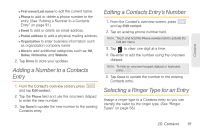
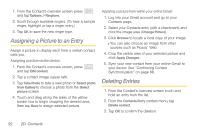
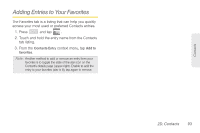
Contacts Ⅲ First name/Last name to edit the current name. Ⅲ Phone to add or delete a phone number to the entry. (See "Adding a Number to a Contacts Entry" on page 91.) Ⅲ Email to add or delete an email address. Ⅲ Postal address to add a physical mailing address. Ⅲ Organization to enter business information such as organization company name. Ⅲ More to add additional categories such as: IM, Notes, Nickname, and Website. 2. Tap Done to store your updates. Adding a Number to a Contacts Entry 1. From the Contact's overview screen, press and tap Edit contact. 2. Tap the Phone field and use the onscreen dialpad to enter the new number. 3. Tap Done to update the new number to the existing Contacts entry. Editing a Contacts Entry's Number 1. From the Contact's overview screen, press and tap Edit contact. 2. Tap an existing phone number field. Note: Touch and hold the Phone number field to activate the Edit text menu. 3. Tap to clear one digit at a time. 4. Re-enter or edit the number using the onscreen dialpad. Note: To hide an onscreen keypad, dialpad or keyboard, press . 5. Tap Done to update the number to the existing Contacts entry. Selecting a Ringer Type for an Entry Assign a ringer type to a Contacts entry so you can identify the caller by the ringer type. (See "Ringer Types" on page 58.) 2D. Contacts 91
-
 1
1 -
2
-
3
-
4
-
5
-
6
-
7
-
8
-
9
-
10
-
11
-
12
-
13
-
14
-
15
-
16
-
17
-
18
-
19
-
20
-
21
-
22
-
23
-
24
-
25
-
26
-
27
-
28
-
29
-
30
-
31
-
32
-
33
-
34
-
35
-
36
-
37
-
38
-
39
-
40
-
41
-
42
-
43
-
44
-
45
-
46
-
47
-
48
-
49
-
50
-
51
-
52
-
53
-
54
-
55
-
56
-
57
-
58
-
59
-
60
-
61
-
62
-
63
-
64
-
65
-
66
-
67
-
68
-
69
-
70
-
71
-
72
-
73
-
74
-
75
-
76
-
77
-
78
-
79
-
80
-
81
-
82
-
83
-
84
-
85
-
86
-
87
-
88
-
89
-
90
-
91
-
92
-
93
-
94
-
95
-
96
-
97
-
98
-
99
-
 100
100 -
 101
101 -
 102
102 -
 103
103 -
 104
104 -
 105
105 -
 106
106 -
 107
107 -
 108
108 -
 109
109 -
 110
110 -
111
-
112
-
113
-
114
-
115
-
116
-
117
-
118
-
119
-
120
-
121
-
122
-
123
-
124
-
125
-
126
-
127
-
128
-
129
-
130
-
131
-
132
-
133
-
134
-
135
-
136
-
137
-
138
-
139
-
140
-
141
-
142
-
143
-
144
-
145
-
146
-
147
-
148
-
149
-
150
-
151
-
152
-
153
-
154
-
155
-
156
-
157
-
158
-
159
-
160
-
161
-
162
-
163
-
164
-
165
-
166
-
167
-
168
-
169
-
170
-
171
-
172
-
173
-
174
-
175
-
176
-
177
-
178
-
179
-
180
-
181
-
182
-
183
-
184
-
185
-
186
-
187
-
188
-
189
-
190
-
191
-
192
-
193
-
194
-
195
-
196
-
197
-
198
-
199
-
200
-
201
-
202
-
203
-
204
-
205
-
206
-
207
-
208
-
209
-
210
-
211
-
212
-
213
-
214
-
215
-
216
-
217
-
218
-
219
-
220
-
221
-
222
-
223
-
224
-
225
-
226
-
227
-
228
-
229
-
230
 |
 |