Samsung YXM1Z Quick Guide (easy Manual) (ver.1.0) (English) - Page 18
Scheduling a Recording Session, Recording a Channel, Record, Schedule Rec, Session, Rec Channel
 |
View all Samsung YXM1Z manuals
Add to My Manuals
Save this manual to your list of manuals |
Page 18 highlights
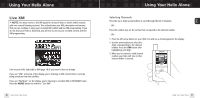
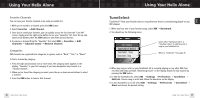
Using Your Helix Alone Recording a Channel 1. While you're listening to live XM, select XM ¨ Record ¨ Rec Channel. You will record the channel you're currently listening to. 2. To stop recording at any time, select XM ¨ Record ¨ Stop Recording. If you change channels, Helix automatically stops recording. 3. You can choose to stop recording at the end of the song you're currently listening to by selecting XM ¨ Record ¨ Record Song. 34 Using Your Helix Alone Using Your Helix Alone Scheduling a Recording Session You can set Helix to record XM at a later time. When you schedule a recording session, remember that Helix must be able to receive a live XM signal when the session begins. 1. To schedule a recording session, select XM ¨ Record ¨ Schedule Rec ¨ New Session. Make sure the time shown on your Helix is correct; otherwise the recording session may not start. If the time is not correct, set the time zone for your location (page 75) and wait until the XM signal updates Helix's clock. 2. The "Scheduled Rec" display allows you to set various options. Use the up and down arrow buttons to adjust each entry. Press the left or right arrow buttons to move to the previous or next option. You can choose to schedule a session for "Today," "Everyday," or a specific "Date." Set start and stop times using the up and down arrow buttons. If the session length exceeds the available memory, you will record over the oldest XM tracks in the memory, so you'll always have the latest content. Choose the channel you want recorded. You can enter the channel number using the remote's numeric keys. Choose "OK" to save the session or "CANCEL" to start over. Helix informs you if there is a scheduling conflict such as overlapping sessions. Using Your Helix Alone 35 ENG
-
 1
1 -
2
-
3
-
4
-
5
-
6
-
7
-
8
-
9
-
10
-
11
-
12
-
 13
13 -
 14
14 -
 15
15 -
 16
16 -
 17
17 -
 18
18 -
 19
19 -
 20
20 -
 21
21 -
 22
22 -
 23
23 -
24
-
25
-
26
-
27
-
28
-
29
-
30
-
31
-
32
-
33
-
34
-
35
-
36
-
37
-
38
-
39
-
40
-
41
-
42
-
43
-
44
-
45
-
46
-
47
 |
 |
