Samsung YXM1Z Quick Guide (easy Manual) (ver.1.0) (English) - Page 30
Transferring Between PC and Helix, Playlists, WARNING, Library/Helix/Playlists
 |
View all Samsung YXM1Z manuals
Add to My Manuals
Save this manual to your list of manuals |
Page 30 highlights
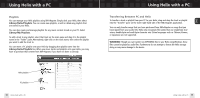
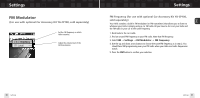
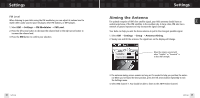
Using Helix with a PC Playlists You can manage your Helix playlists using XM+Napster. Simply dock your Helix, then select Library/Helix/Playlists. You can create new playlists, or edit or delete any playlists that are stored in your Helix. You can also create and manage playlists for any music content stored on your PC. Select Library/My Playlists. To add a track to any playlist, select that track on the main pane and drag it to the playlist name in the "Folder" pane. Alternatively, right-click on the track name, then select the playlist you want to add the track to. You can move a PC playlist onto your Helix by dragging that playlist name into the Library/Helix/Playlists line. When you move tracks and playlists onto your Helix, you may have to purchase that content from XM+Napster, if you have not done so already. Helix playlists PC playlists 58 Using Helix with a PC Using Helix with a PC Transferring Between PC and Helix To transfer a track or playlist from your PC to your Helix, drag and drop the track or playlist into the "transfer" pane on the lower right-hand side of the XM+Napster application. You can only transfer songs that you have purchased from XM+Napster or songs that you have ripped from your audio CDs. Helix only recognizes file names that use single-byte characters; double-byte and multi-byte character sets (Asian languages such as Chinese, Korean, or Japanese) are not supported. WARNING: Though you can transfer non-MP3/WMA files to your Helix using Windows, those files cannot be played as audio files. Furthermore, do not attempt to format the Helix storage; doing so may cause damage to the device. Using Helix with a PC 59 ENG
-
 1
1 -
2
-
3
-
4
-
5
-
6
-
7
-
8
-
9
-
10
-
11
-
12
-
13
-
14
-
15
-
16
-
17
-
18
-
19
-
20
-
21
-
22
-
23
-
24
-
 25
25 -
 26
26 -
 27
27 -
 28
28 -
 29
29 -
 30
30 -
 31
31 -
 32
32 -
 33
33 -
 34
34 -
 35
35 -
36
-
37
-
38
-
39
-
40
-
41
-
42
-
43
-
44
-
45
-
46
-
47
 |
 |
