Sanyo PLV Z3 Owners Manual - Page 49
Cleaning the Projection Lens, Cleaning the Projector Cabinet, Replacing the Air Filter
 |
View all Sanyo PLV Z3 manuals
Add to My Manuals
Save this manual to your list of manuals |
Page 49 highlights
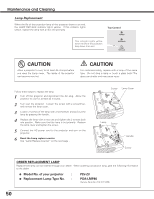
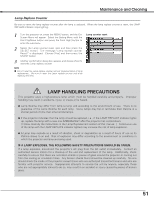
Maintenance and Cleaning Replacing the Air Filter When there is much dust and dirt on the air filter, replace it with a new one following the steps below. 1 After removing the air filter from the projector as described above, remove the replacement filter from the holder. 2 Holds the air filter with both hands, and remove the replacement filter by pulling it up. 3 Install a new replacement filter and put the air filter back into the projector. Remove the replacement filter as shown this figure. Replacement Filter Holder Cleaning the Projection Lens Follow these steps to clean the projection lens. 1 Disconnect the AC power cord before cleaning. 2 Softly wipe the projection lens with a cleaning cloth that con- tains a small amount of non-abrasive camera lens cleaner, or use lens cleaning paper or a commercially available air blower to clean the lens. Avoid using an excessive amount of cleaner. Abrasive cleaners, solvents, or other harsh chemicals might scratch the surface. 3 When the projector is not in use, replace the lens cover. Cleaning the Projector Cabinet Follow these steps to clean the projector cabinet. 1 Disconnect the AC power cord before cleaning. 2 Softly wipe the projector body with a soft, dry cleaning cloth. When it is heavily soiled, use a small amount of mild detergent and finish with a soft, dry cleaning cloth. Avoid using an excessive amount of cleaner. Abrasive cleaners, solvents, or other harsh chemicals might scratch the surface. 3 When the projector is not in use, put the projector in the carrying case to protect it from dust and scratches. Install the replacement filter securely. 49
-
 1
1 -
2
-
3
-
4
-
5
-
6
-
7
-
8
-
9
-
10
-
11
-
12
-
13
-
14
-
15
-
16
-
17
-
18
-
19
-
20
-
21
-
22
-
23
-
24
-
25
-
26
-
27
-
28
-
29
-
30
-
31
-
32
-
33
-
34
-
35
-
36
-
37
-
38
-
39
-
40
-
41
-
42
-
43
-
 44
44 -
 45
45 -
 46
46 -
 47
47 -
 48
48 -
 49
49 -
 50
50 -
 51
51 -
 52
52 -
 53
53 -
 54
54 -
55
-
56
-
57
-
58
-
59
-
60
 |
 |
