Sanyo XU86 Instruction Manual, PLC-XU86 - Page 14
Wireless Mouse Operation, Remote Control Code
 |
View all Sanyo XU86 manuals
Add to My Manuals
Save this manual to your list of manuals |
Page 14 highlights
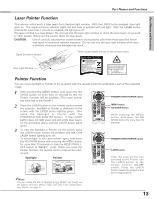
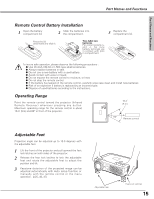
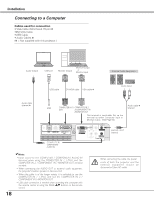
Part Names and Functions Wireless Mouse Operation The remote control can be used as a wireless mouse for your computer. Before operating the wireless mouse, connect your computer and the projector with the supplied USB cable. (See page 18 for connection.) When the Pointer function is used, the wireless mouse is not available. L-CLICK button Acts as left click while the projector and a computer are connected with a USB cable. PRESENTATION POINTER button Move the pointer on the screen with this button. R-CLICK button Acts as right click while the projector and a computer are connected with a USB cable. Remote Control Code This projector has eight different remote control codes (Code 1-Code 8). Switching remote control codes prevents remote control interference when operating several projectors or video equipment at the same time. Change the remote control code for the projector first before changing that for the remote control. See "Remote control" in Setting on page 51. 1 With holding down the MENU button, press the IMAGE button. The code switches sequentially for one pressing the IMAGE button. (See the list below.) 2 To initialize the remote control code, slide the RESET/ON/ALL-OFF switch to RESET, and then to ON. The initial code is Code 1. While pressing the MENU button, press the IMAGE button number of times corresponding to the remote control code. Remote Control Code Code 1 Code 2 Code 3 Code 4 Code 5 Code 6 Code 7 Code 8 Number of Times of Pressing IMAGE Button 1 2 3 4 5 6 7 8 MENU button IMAGE button 14
-
 1
1 -
2
-
3
-
4
-
5
-
6
-
7
-
8
-
 9
9 -
 10
10 -
 11
11 -
 12
12 -
 13
13 -
 14
14 -
 15
15 -
 16
16 -
 17
17 -
 18
18 -
 19
19 -
20
-
21
-
22
-
23
-
24
-
25
-
26
-
27
-
28
-
29
-
30
-
31
-
32
-
33
-
34
-
35
-
36
-
37
-
38
-
39
-
40
-
41
-
42
-
43
-
44
-
45
-
46
-
47
-
48
-
49
-
50
-
51
-
52
-
53
-
54
-
55
-
56
-
57
-
58
-
59
-
60
-
61
-
62
-
63
-
64
-
65
-
66
-
67
-
68
-
69
-
70
-
71
-
72
 |
 |
