Sanyo XU86 Instruction Manual, PLC-XU86 - Page 39
Video Input, Input Source Selection (Vide...
 |
View all Sanyo XU86 manuals
Add to My Manuals
Save this manual to your list of manuals |
Page 39 highlights
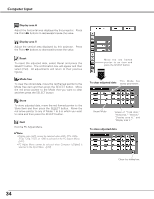
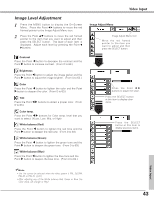
Video Input Input Source Selection (Video, S-video) Direct Operation Choose Video by pressing the INPUT button on the top control or the VIDEO button on the remote control. Before using these buttons, correct input source should be selected through menu operation as described below. Top Control INPUT button ON - OFF POWER MENU WARNING INPUT LAMP R AUTO SET SELECT -V + V INPUT button Computer 1 (Analog/Digital) Computer 2 ✳ Video Wired ✳ See Note at the bottom of this page. Remote Control Menu Operation 1 Press the MENU button to display the On-Screen Menu. Press the Point 7 8 buttons to move the red framed pointer to the Input Menu icon. VIDEO button Input Menu Input Menu icon 2 Press the Point ed buttons to move the red arrow pointer to Video and then press the SELECT button to display the Source Select Menu . 3 Move the pointer to the source that you want to select and then press the SELECT button. Auto When selecting Auto, the projector automatically detects incoming video signal, and adjusts itself to optimize its performance. The projector selects connection in the following order: 1. S-video 2. Video Video When video input signal is connected to the VIDEO jack, select Video. S-video When video input signal is connected to the SVIDEO jack, select S-video. ✔Note: •When Monitor out is selected in the Terminal function (p50), Computer 2 is not displayed. •Wired, Wireless, Memory Viewer are for the Network function. See owner's manual (Additional Vol.) and owner's manual of Memory viewer (optionally available). VIDEO Move the pointer to Video and press the SELECT button. Source Select Menu (VIDEO) Move the pointer to the source that you want to select and press the SELECT button. 39 Video Input
-
 1
1 -
2
-
3
-
4
-
5
-
6
-
7
-
8
-
9
-
10
-
11
-
12
-
13
-
14
-
15
-
16
-
17
-
18
-
19
-
20
-
21
-
22
-
23
-
24
-
25
-
26
-
27
-
28
-
29
-
30
-
31
-
32
-
33
-
 34
34 -
 35
35 -
 36
36 -
 37
37 -
 38
38 -
 39
39 -
 40
40 -
 41
41 -
 42
42 -
 43
43 -
 44
44 -
45
-
46
-
47
-
48
-
49
-
50
-
51
-
52
-
53
-
54
-
55
-
56
-
57
-
58
-
59
-
60
-
61
-
62
-
63
-
64
-
65
-
66
-
67
-
68
-
69
-
70
-
71
-
72
 |
 |
