Sharp DT 500 DT-500 Operation Manual - Page 48
Using the, Options
 |
UPC - 074000364837
View all Sharp DT 500 manuals
Add to My Manuals
Save this manual to your list of manuals |
Page 48 highlights
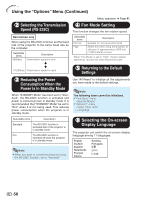
Using the "Options" Menu Options 1 1 Image Shift 2 Overscan H 2 Overscan V 3 Subtitle 4 OSD Display 5 Video System 6 Signal Type 7 HDMI Setting 8 Background 9 Auto Power Off 0 Lamp Timer(Life) INPUT 1 0 0 0 0 On Auto Auto Standard Blue On 0h 100% Settings on the Options 1 menu Menu operation n Page 41 2 Adjusting the Overscan This function allows you to adjust the Overscan area ratio (display area ratio). Orientation Overscan H (Horizontal) Overscan V (Vertical) O button Q button Reduces the image. (The display area ratio becomes larger.) Enlarges the image. (The display area ratio becomes smaller.) 1 Adjusting the Image Position You can move the projected image vertically. Note • This function can only be adjusted when a video, S-video, or Component signal is input. • If the display area ratio is set too large, noise may appear at the screen edges. If this happens, set the display area ratio to a smaller value. • When "Resize" is set to "CINEMA ZOOM", depending on the input signal, "Overscan V" may not be adjustable. • Also read "About Copyrights" on page 37. O button Q button Note • The Image Shift function cannot be selected when "Resize" is set to "DOT BY DOT". • You can also use the IMAGE SHIFT buttons on the remote control to adjust the image position. 3 Adjusting the Vertical Size of the Display (Subtitle Setting) With this function, you can adjust the vertical size of the display to allow for subtitles. O button Q button The image is compressed by adjusting the vertical size of the display. The image is enlarged by adjusting the vertical size of the display. Note • When changing the screen with the Subtitle setting, not only the bottom of the screen rises, but also the upper part is changed to a certain point. • The Subtitle setting can be adjusted more effectively with the Overscan and Image Shift functions. • The Subtitle setting only works when "Resize" is set to "CINEMA ZOOM". • The adjustment area changes according to the input signal. Useful Features 47
-
 1
1 -
2
-
3
-
4
-
5
-
6
-
7
-
8
-
9
-
10
-
11
-
12
-
13
-
14
-
15
-
16
-
17
-
18
-
19
-
20
-
21
-
22
-
23
-
24
-
25
-
26
-
27
-
28
-
29
-
30
-
31
-
32
-
33
-
34
-
35
-
36
-
37
-
38
-
39
-
40
-
41
-
42
-
 43
43 -
 44
44 -
 45
45 -
 46
46 -
 47
47 -
 48
48 -
 49
49 -
 50
50 -
 51
51 -
 52
52 -
 53
53 -
54
-
55
-
56
-
57
-
58
-
59
-
60
-
61
-
62
-
63
-
64
-
65
-
66
 |
 |
