Sharp SD-AS10 SD-AS10 Operation Manual - Page 19
TV connection
 |
UPC - 074000413757
View all Sharp SD-AS10 manuals
Add to My Manuals
Save this manual to your list of manuals |
Page 19 highlights
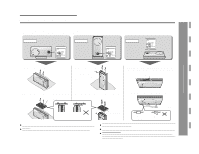
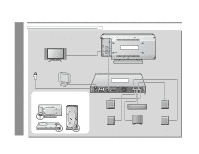
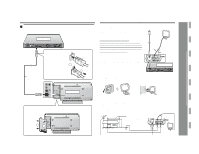
Preparation for Use - TV connection - TV connection Three types of jacks (VIDEO OUT, S-VIDEO OUT and COMPONENT VIDEO OUT) are available for connection of a TV and this unit. Connect according to your TV. Connect the optional S-video cable or component video cable for higher quality DVD images. For the component video cable, the progressive video mode is available and you can enjoy images with less flicker (default setting: PROGRESSIVE OFF). See page 25 for details. Connecting to a TV with a video input jack Main unit TV To video output jack Video cable (supplied) To video input jack Connecting to a TV with an S-video input jack Main unit TV Connecting to a TV with component video input jacks Main unit TV To component video output jacks Green Red Component video cable (commercially available) Green Blue Blue To component Red video input jacks Notes: ! Change the TV input in accordance with the connected jack. ! Do not connect other equipment between the TV and this unit. If they are con- nected via a VCR, pictures may be distorted. ! If your TV has different indications for the component video inputs (Y, CB and CR or Y, B-Y and P-Y), connect jacks with its matching color. ! Do not connect to a component video input jack designed for the high-vision sys- tem, which is not DVD-compatible (the images may be distorted or not appear). ! Using the audio cable, you can listen to the TV sound with this unit (see page 56). " Attaching the side cover SD-AS10 To S-video S-video cable (commercially available) output jack To S-video input jack 1 After making all the connections, attach the side cover to the main unit. Fit the claws into the holes. 2 Route all the cables through the hole of the cover. 19
-
 1
1 -
2
-
3
-
4
-
5
-
6
-
7
-
8
-
9
-
10
-
11
-
12
-
13
-
 14
14 -
 15
15 -
 16
16 -
 17
17 -
 18
18 -
 19
19 -
 20
20 -
 21
21 -
 22
22 -
 23
23 -
 24
24 -
25
-
26
-
27
-
28
-
29
-
30
-
31
-
32
-
33
-
34
-
35
-
36
-
37
-
38
-
39
-
40
-
41
-
42
-
43
-
44
-
45
-
46
-
47
-
48
-
49
-
50
-
51
-
52
-
53
-
54
-
55
-
56
-
57
-
58
-
59
-
60
-
61
-
62
-
63
-
64
 |
 |
