Sharp YO-520P Operation Manual
Sharp YO-520P - Memo Master Manual
 |
UPC - 074000016385
View all Sharp YO-520P manuals
Add to My Manuals
Save this manual to your list of manuals |
Sharp YO-520P manual content summary:
- Sharp YO-520P | Operation Manual - Page 1
ELECTRONIC ORGANIZER YO-520 OPERATION MANUAL Instrucciones abreviadas en español CONTENTS Using the Organizer for the First Time 1 When Abnormal Conditions Cause a Malfunction 1 Auto Power Off 23 Specifications 24 Using the included Software CD-ROM 26 Instrucciones abreviadas en español S-1 - Sharp YO-520P | Operation Manual - Page 2
repairs, defects, battery replacement, use after the specified battery life has expired, or any other cause. • SHARP SHARP approved service facility. Included in this Package • SHARP Electronic Organizer YO-520 • Alkaline batteries LR03 x 2 • Operation manual (This book) • Software CD-ROM • PC Link - Sharp YO-520P | Operation Manual - Page 3
pen or similar object. Do not use an object with a breakable or sharp tip. • Under certain conditions the message may appear as "Data has been Refer to page 6.) When Abnormal Conditions Cause a Malfunction If the Organizer is subjected to strong, extraneous electrical noises or shocks during use, - Sharp YO-520P | Operation Manual - Page 4
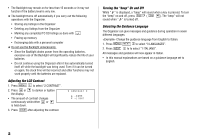
will significantly reduce the life of your batteries. • Do not continue using the Organizer after it has automatically turned itself off while the backlight was being used. and guidance will now appear in Italian. • In this manual explanations are based on a guidance language set to English. 2 - Sharp YO-520P | Operation Manual - Page 5
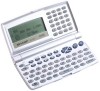
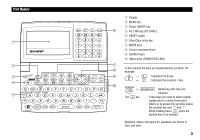
Part Names 1 2 3 4 5 q Display w MENU key e Power ON/OFF key 6 r PC-LINK key (PC SYNC) t RESET switch y Clear/Clear entry key u MODE keys i Cursor movement keys o SEARCH keys !0 Option port (COMPUTER LINK) 7 8 In this manual the keys are represented by symbols, for example: 9 → & : - Sharp YO-520P | Operation Manual - Page 6
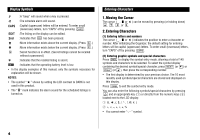
the operating battery level is low. • In the display examples of this manual, only the symbols necessary for explanation will be shown. NOTES: • The the position to enter a character or number. After initializing the Organizer, the default setting for entering letters will be capital (uppercase) - Sharp YO-520P | Operation Manual - Page 7
C•CE and reenter. • Press C•CE to clear all characters on the current display. Note on the Description of the MENU Key Operations This Organizer offers a variety of functions which you choose from the menus (see the following table). To switch or scroll the menu screens displayed by pressing - Sharp YO-520P | Operation Manual - Page 8
23. The names and zone numbers of 27 cities are stored in the Organizer's memory. (See the following table.) 1. Press CLOCK once or twice the desired city which corresponds to your local zone from the cities stored in the Organizer. 6 4. Press ENTER to set the Home city. • Zone numbers 0, 14, - Sharp YO-520P | Operation Manual - Page 9
5. Enter the month, day, and year. 04122001 Use to skip entering a number that needs no change. 6. Press ENTER . The clock starts from 0 second. 2.Using the World Clock Changing the city for the World clock 1. Press CLOCK once or twice to display the World clock. 2. Press 2nd EDIT . 3. Press NEXT - Sharp YO-520P | Operation Manual - Page 10
201-265-5600 [email protected] - 6. Press ENTER , then enter the address. For example, Box G, Sharp Plaza, Mahwah, New Jersey, 07430-2135, U.S.A. 201-265-5600 [email protected] Box G, Sharp Plaza, Mahwah, New Jersey, 07430-2135, U.S.A.- 7. Press ENTER . "STORED!" will be displayed briefly - Sharp YO-520P | Operation Manual - Page 11
22 23 24 25 26 27 28 2. Press NEXT (or PREV ) to display the calendar for the next (or previous) month. • When you reset the Organizer, the calendar defaults to Jan. 1, 2001. 2.Selecting the Weekly Format The weekly format can be switched between SUN-SAT and MON-SUN. 1. Press CALENDAR to - Sharp YO-520P | Operation Manual - Page 12
(1) Enter the desired date in Calendar mode Enter the following data. "Lunch with Tom" from 11:30 AM to 1:00 PM on June 24, 2001. 1. Press 2nd CALENDAR in Calendar mode to display the calendar for the current date (For example, April 12, 2001). 2. Press NEXT NEXT 24, 2001. to move the - Sharp YO-520P | Operation Manual - Page 13
for the alarm and the alarm has been turned on, the alarm will sound automatically and the relevant item will be displayed even if the Organizer has been turned off. The alarm can also be set to sound for secret items without displaying the item. Set an alarm for June - Sharp YO-520P | Operation Manual - Page 14
To Do Mode 1.Storing the Listings 1. Press TO DO to display the To Do entry prompt. TO DO DESCRIPTION? 2. Enter the description. For example, Call Frank about a sales meeting 3. Press ENTER . 4. Enter the priority. For example, 2 Call Frank about a s PRIORITY:2 5. Press ENTER to store it in - Sharp YO-520P | Operation Manual - Page 15
Expense Mode 1.Creating the Expense Records The date is April 5, 2001. You bought flight tickets for a business trip for $1,200. 1. Press EXPENSE to enter the Expense mode. • The month and the day must be EXPENSE DATE? M/D/Y= 4/12/2001 entered using 2 digits and the year using 4 - Sharp YO-520P | Operation Manual - Page 16
5. Press ENTER . • Press ENTER to return to the date entry prompt. • If the integer section in the calculation result exceeds 12 digits, " , , displayed. -PERIOD- FROM :APR 1,2001 TO :APR 30,2001 1,415.25 , . " is See also ... Recalling the Listings 15 Editing the Listings 17 Deleting the - Sharp YO-520P | Operation Manual - Page 17
Memory Deleting or modifying data during operation can produce unnecessary space in the memory of the Organizer. Delete unnecessary space and free up memory, when the Organizer displays "MEMORY FULL!". 1. Press MENU NEXT . 2. Press 2 to start freeing up memory. • "WORKING..." is displayed indicating - Sharp YO-520P | Operation Manual - Page 18
desired listing in Telephone, Schedule, To Do, or Memo mode. Recall the listings containing the word "Sharp" in the TEL1 file. 1. Press TEL to display the TEL1 file. 2. Enter the word. Sharp 3. Press 2nd NEXT . • Each time 2nd NEXT are pressed, subsequent listings containing the word - Sharp YO-520P | Operation Manual - Page 19
4. Press ENTER . The specified calendar or schedule will be displayed. (2) Expense listings Press C•CE in the Expense entry prompt, then enter the date and press NEXT (or PREV ). 7.Other Search in Calendar Mode Recalling the scheduled item from the Calendar mode The scheduled date is displayed with - Sharp YO-520P | Operation Manual - Page 20
the deletion operation, press N . • "DELETED!" is displayed briefly and the password and all secret listings are deleted. 18 Calculator Mode The Organizer's built-in calculator can perform the 4 arithmetic calculations in up to 12 digits. Calculator mode is selected by pressing CALC/CONV once or - Sharp YO-520P | Operation Manual - Page 21
Example Ȉȉ25ȉ-ȉ9 = (43)2 = 1/8 25 × 5 = -) 84 ÷ 3 = +) 68 + 17 = (Total) = 123456789098 × 145 = Operation 25 - 9 = 4 == = 8 = Display 4. 4,096. 0.125 CM 25 5 M+ 84 3 M- 68 + 17 M+ RM -M- 125. -M- 28. -M- 85. -M- 182. 123456789098 C•CE 145 = - E - 17.9012344192 17.9012344192 (17.9012344192 - Sharp YO-520P | Operation Manual - Page 22
2.Setting the Rate Set the following rate: $1 = £0.6 1. Press CALC/CONV once or twice to select the Conversion mode. 2. Press NEXT (or PREV ) to select the conversion display number 1. 3. Press 2nd EDIT . • The result display disappears and the rate display flashes. 4. Enter the rate ( - Sharp YO-520P | Operation Manual - Page 23
the display changes into the entry prompt. • Even after the Secret function is turned off, the Secret function will automatically be turned on after manual or auto power off. (2) Turning the Secret function on 1. Press 2nd SECRET . 2. Press 1 to select "1 HIDE SECRET". "SECRET DATA IS HIDDEN!" is - Sharp YO-520P | Operation Manual - Page 24
(2) Designating a stored listing as secret Designate the listing for "Xmas presents list" as secret. 1. Recall the listing. Xmas presents list S Sweater for Jill Ring for Mother 2. Press 2nd EDIT to enter the edit mode. 3. Press 2nd MARK . The " " is displayed. Xmas presents list S - Sharp YO-520P | Operation Manual - Page 25
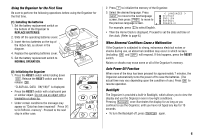
levels which are warning and fatal. When the batteries is in warning level, the BATT symbol appears at the display. In fatal level, the organizer will turn off automatically without indication. If the BATT symbol still appears or nothing is shown, replace both of the operating batteries immediately - Sharp YO-520P | Operation Manual - Page 26
contrast • The CAPS on and off • The memory of the calculator • The first display contents when you press SMBL Specifications Model: YO-520 Display: 120 × 40 dot matrix liquid crystal display Applications: Calendar, Schedule, To Do, Anniversary, Telephone, Memo, Expense, Expense Report, Clock - Sharp YO-520P | Operation Manual - Page 27
(W) × 145.5 mm (D) × 11.8 mm (H) 5-15/32" (W) × 5-23/32" (D) × 15/32" (H) 139 mm (W) × 80 mm (D) × 21 mm (H) 5-15/32" (W) × 3-5/32" (D) × 13/16" (H) Alkaline batteries LR03 x 2, Operation manual, Software CD-ROM, PC Link cable 25 - Sharp YO-520P | Operation Manual - Page 28
for use with your Organizer. These helpful software are easy to install. Place the CD-ROM in the CDROM drive on your PC, and the "SHARP Electronic Organizer Menu" window will appear. Follow the instructions on the screen to complete the installation. If the "SHARP Electronic Organizer Menu" does not - Sharp YO-520P | Operation Manual - Page 29
4. Turn on your PC and Organizer. 5. Press PC SYNC on your Organizer. • Your Organizer is now ready to exchange data. • Press ON at any time to exit the PC-Link mode. PC SYNC/LINK READY! Press [ON] to quit. • The alarm setting is ignored. The alarm will not sound during data transfer. • The Auto - Sharp YO-520P | Operation Manual - Page 30
MEMO 28 - Sharp YO-520P | Operation Manual - Page 31
los listines S-5 Modo de conversión S-5 Utilización del CD-ROM de Software incluido S-6 Empleo del Organizador por primera vez ESPAÑOL (1) Instalación pilas 1. Ajuste el interruptor de recambio de las pilas en la parte inferior del Organizador a REPLACE BATTERIES. 2. Deslice y saque la tapa - Sharp YO-520P | Operation Manual - Page 32
Luz de fondo Pulsando BackLight una vez la pantalla permanece encendida mientras continúa usando el Organizador, hasta que deje de accionar las teclas durante 15 segundos. Ajuste del contraste de LCD 1. Pulse MENU 2 para seleccionar "2 CONTRAST" (2 CONTRASTE). 2. Pulse o para hacer la pantalla - Sharp YO-520P | Operation Manual - Page 33
Johns, Pat ENTER 201-265-5600 F 265-1234 ENTER [email protected] ENTER Box G, Sharp Plaza, Mahwah, New Jersey, 07430-2135, U.S.A. ENTER 201-265-5600 [email protected] Box G, Sharp Plaza, Mahwah, New Jersey, 07430-2135, U.S.A.- Visualización del calendario mensual NEXT PREV : para visualizar - Sharp YO-520P | Operation Manual - Page 34
Verificación de los ítems realizados 1. Pulse ENTER para ingresar el modo de índice. 2. Pulse para seleccionar el ítem. 3. Pulse para marcarlo como ítem realizado. • A los ítems marcados " " se asigna la prioridad más baja y se clasifican al final de la lista. Almacenamiento de los listines de - Sharp YO-520P | Operation Manual - Page 35
nombre deseado en cada modo. 2. Pulse NEXT (o PREV ). (3) Búsqueda por palabra clave 1. Seleccione el modo deseado. (Por ejemplo, pulse TEL ). 2. Introduzca la palabra. Sharp 3. Pulse 2nd NEXT . • Cada vez que pulsa 2nd NEXT , se visualizarán los listines subsiguientes que contengan la palabra - Sharp YO-520P | Operation Manual - Page 36
PC. (2) Instalación del Software de PC Para instalar el Software de PC, asegúrese de que su PC esté ejecutando Windows y de que tiene a mano el CD-ROM del paquete de su Organizador SHARP puerto opcional (COMPUTER LINK) de su Organizador. 4. Encienda su PC y su Organizador. 5. Pulse PC SYNC en su - Sharp YO-520P | Operation Manual - Page 37
• EL ajuste de la alarma será ignorado. La alarma no sonará durante la transferencia de datos. • La función de desactivado automático se inhabilita en el modo de enlace de PC. • Si aparece un mensaje de error mientras transfiere los datos, pulse ON . S-7 - Sharp YO-520P | Operation Manual - Page 38
Electronic Organizer : YO-520 This device complies with Part 15 installed and used in accordance with the instructions, may cause harmful interference to radio communications SUPPORT If you have read the ORGANIZER operation manual, but you still require product support, you can: Call a Sharp - Sharp YO-520P | Operation Manual - Page 39
liability or otherwise. In no event shall Sharp THIS WARRANTY GIVES YOU SPECIFIC LEGAL RIGHTS. YOU MAY ALSO HAVE OTHER RIGHTS WHICH VARY FROM STATE TO STATE. Your Product : Electronic Organizer Warranty Period for this Product : One (1) year parts and labor from date of purchase. Additional - Sharp YO-520P | Operation Manual - Page 40
SHARP ELECTRONICS CORPORATION Sharp Plaza, Mahwah, New Jersey 07430-2135 PRINTED IN CHINA/IMPRESO EN CHINA 00CTO (TINSE0365EHZZ)
-
 1
1 -
 2
2 -
 3
3 -
 4
4 -
 5
5 -
 6
6 -
 7
7 -
8
-
9
-
10
-
11
-
12
-
13
-
14
-
15
-
16
-
17
-
18
-
19
-
20
-
21
-
22
-
23
-
24
-
25
-
26
-
27
-
28
-
29
-
30
-
31
-
32
-
33
-
34
-
35
-
36
-
37
-
38
-
39
-
40
 |
 |

ELECTRONIC ORGANIZER
OPERATION MANUAL
Instrucciones abreviadas en español
YO-520
CONTENTS
Using the Organizer for the First Time
..................................................
1
When Abnormal Conditions Cause a Malfunction
.................................
1
Auto Power Off Function
......................................................................
1
Backlight
..............................................................................................
1
Adjusting the LCD Contrast
..................................................................
2
Turning the “beep” On and Off
..............................................................
2
Selecting the Guidance Language
.........................................................
2
Part Names
.................................................................................................
3
Display Symbols
.........................................................................................
4
Entering Characters
....................................................................................
4
Note on the Description of the MENU Key Operations
................................
5
Notes for the Built-in Calendar and the Time
..............................................
5
Clock Mode
................................................................................................
6
Telephone Mode
.........................................................................................
8
Calendar Mode
...........................................................................................
9
Schedule Mode
...........................................................................................
9
To Do Mode
..............................................................................................
12
Memo Mode
.............................................................................................
12
Expense Mode
..........................................................................................
13
Anniversary Mode
....................................................................................
14
Checking the Memory Storage
.................................................................
15
Freeing Up Memory
..................................................................................
15
Recalling the Listings
...............................................................................
15
Editing the Listings
...................................................................................
17
Deleting the Listings
.................................................................................
17
Calculator Mode
.......................................................................................
18
Conversion Mode
.....................................................................................
19
Secret Function
........................................................................................
21
Battery Replacement
................................................................................
23
Specifications
...........................................................................................
24
Using the included Software CD-ROM
................
26
Instrucciones abreviadas en español
......................................................
S-1