Sony Ericsson T637 User Guide - Page 48
Unsaved Numbers, Read Report - user manual
 |
View all Sony Ericsson T637 manuals
Add to My Manuals
Save this manual to your list of manuals |
Page 48 highlights
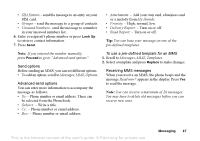
• SIM Entries - send the message to an entry on your SIM card. • Groups - send the message to a group of contacts. • Unsaved Numbers- send the message to a number in your unsaved numbers list. 6. Enter a recipient's phone number or press Look Up to retrieve contact information. 7. Press Send. • Attachments: - Add your own card, a business card or a melody from My Sounds. • Priority: - High, normal, low. • Delivery Report: - Turn on or off. • Read Report: - Turn on or off. Tip: You can base your message on one of the pre-defined templates. Note: If you entered the number manually, press Proceed to go to "Advanced send options". Send options Before sending an MMS, you can set different options. • To edit an option, scroll to Messages, MMS, Options. Advanced send options You can enter more information to accompany the message as follows: • To: - Phone number or email address. These can be selected from the Phonebook. • Subject: - Write a title. • Cc: - Phone number or email address. • Bcc: - Phone number or email address. To use a pre-defined template for an MMS 1. Scroll to Messages, MMS, Templates. 2. Select a template and press Replace to make changes. Receiving MMS messages When you receive an MMS, the phone beeps and the message Read now? appears in the display. Press Yes to read the message. Note: You can receive a maximum of 20 messages. You may have to delete old messages before you can receive new ones. This is the Internet version of the user's guide. © Print only for private use. Messaging 47
-
 1
1 -
2
-
3
-
4
-
5
-
6
-
7
-
8
-
9
-
10
-
11
-
12
-
13
-
14
-
15
-
16
-
17
-
18
-
19
-
20
-
21
-
22
-
23
-
24
-
25
-
26
-
27
-
28
-
29
-
30
-
31
-
32
-
33
-
34
-
35
-
36
-
37
-
38
-
39
-
40
-
41
-
42
-
 43
43 -
 44
44 -
 45
45 -
 46
46 -
 47
47 -
 48
48 -
 49
49 -
 50
50 -
 51
51 -
 52
52 -
 53
53 -
54
-
55
-
56
-
57
-
58
-
59
-
60
-
61
-
62
-
63
-
64
-
65
-
66
-
67
-
68
-
69
-
70
-
71
-
72
-
73
-
74
-
75
-
76
-
77
-
78
-
79
-
80
-
81
-
82
-
83
-
84
-
85
-
86
-
87
-
88
-
89
-
90
-
91
-
92
-
93
-
94
-
95
-
96
-
97
-
98
-
99
 |
 |
