Sony BDV-N5200W Operating Instructions - Page 20
Getting Started, Step 1: Installing the Speakers, Step 2: Connecting the System - subwoofer
 |
View all Sony BDV-N5200W manuals
Add to My Manuals
Save this manual to your list of manuals |
Page 20 highlights
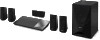
Getting Started Getting Started Step 1: Installing the Speakers Install the speakers by referring to the illustration below. To assemble the speakers, refer to the supplied "Speaker Installation Guide". A Front left speaker (L) B Front right speaker (R) C Center speaker D Surround left speaker (L) E Surround right speaker (R) F Subwoofer G TV Installing the surround speakers in rear position (Speaker layout: [Standard]) A GC B F D E Installing all speakers in front position (Speaker layout: [All Front]) DA G C B E F Note • Be sure to select the speakers layout setting (page 47) according to your speakers placement. • Use caution when placing the speakers and/or speaker stands attached to the speakers on a specially treated (waxed, oiled, polished, etc.) floor, as staining or discoloration may result. • Do not lean or hang on a speaker, as it may fall down. • The speakers of this system are not magnetically shielded. This may result in color irregularity when they are placed near a CRT TV or projector. Tip • In order to output more effective sound when [All Front] setting is selected, we recommend you to install your front speakers and surround speakers closer to each other. • You can install the speakers on a wall. For details, refer to the supplied "Speaker Installation Guide". Step 2: Connecting the System Do not connect the AC power cord (mains lead) of the main unit to a wall outlet (mains) until all the other connections are made. Note When you connect other equipment with a volume control, turn down the volume of the equipment to a level where sound is not distorted. 20US
-
 1
1 -
2
-
3
-
4
-
5
-
6
-
7
-
8
-
9
-
10
-
11
-
12
-
13
-
14
-
 15
15 -
 16
16 -
 17
17 -
 18
18 -
 19
19 -
 20
20 -
 21
21 -
 22
22 -
 23
23 -
 24
24 -
 25
25 -
26
-
27
-
28
-
29
-
30
-
31
-
32
-
33
-
34
-
35
-
36
-
37
-
38
-
39
-
40
-
41
-
42
-
43
-
44
-
45
-
46
-
47
-
48
-
49
-
50
-
51
-
52
-
53
-
54
-
55
-
56
-
57
-
58
-
59
-
60
-
61
-
62
-
63
-
64
-
65
-
66
-
67
-
68
-
69
-
70
-
71
-
72
-
73
-
74
-
75
-
76
-
77
-
78
-
79
-
80
-
81
-
82
-
83
-
84
 |
 |
