Sony DAV-LF1H Operating Instructions - Page 11
Step 1: Assembling the system, Assembling the control unit - speakers
 |
View all Sony DAV-LF1H manuals
Add to My Manuals
Save this manual to your list of manuals |
Page 11 highlights
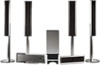
Getting Started - BASIC - Step 1: Assembling the system Before connecting, attach the stands to the control unit and the speakers. Tip • We recommend that you spread a cloth on the floor to avoid damaging the floor when assembling. Assembling the control unit Attach the stand to the control unit. Use the parts illustrated below. Control unit (1) Control unit stand (1) Control unit stand cover Screw (black, small) (1) (1) Tip • You can install the control unit on a wall using an optional kit (not supplied). 1 Hook the studs of the control unit on the keyslots of the control unit stand, then secure the control unit with the screw. Control unit Screw (black, small) Control unit stand , SYSTEM CONTROL cord Hook the SYSTEM CONTROL cord in the clamp on the control unit stand. continued 11US
-
 1
1 -
2
-
3
-
4
-
5
-
 6
6 -
 7
7 -
 8
8 -
 9
9 -
 10
10 -
 11
11 -
 12
12 -
 13
13 -
 14
14 -
 15
15 -
 16
16 -
17
-
18
-
19
-
20
-
21
-
22
-
23
-
24
-
25
-
26
-
27
-
28
-
29
-
30
-
31
-
32
-
33
-
34
-
35
-
36
-
37
-
38
-
39
-
40
-
41
-
42
-
43
-
44
-
45
-
46
-
47
-
48
-
49
-
50
-
51
-
52
-
53
-
54
-
55
-
56
-
57
-
58
-
59
-
60
-
61
-
62
-
63
-
64
-
65
-
66
-
67
-
68
-
69
-
70
-
71
-
72
-
73
-
74
-
75
-
76
-
77
-
78
-
79
-
80
-
81
-
82
-
83
-
84
-
85
-
86
-
87
-
88
-
89
-
90
-
91
-
92
-
93
-
94
-
95
-
96
-
97
-
98
-
99
-
100
-
101
-
102
-
103
-
104
-
105
-
106
-
107
-
108
-
109
-
110
-
111
-
112
-
113
-
114
-
115
-
116
-
117
-
118
-
119
-
120
-
121
-
122
-
123
-
124
-
125
-
126
-
127
 |
 |
