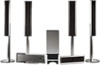
Sony DAV-LF1H Operating Instructions - Page 88
in stop mode., to select [YES], then press
 |
View all Sony DAV-LF1H manuals
Add to My Manuals
Save this manual to your list of manuals |
Page 88 highlights
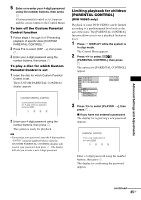
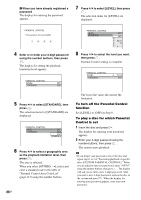
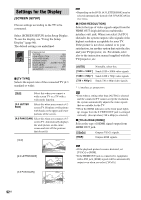
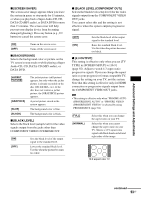
1 Connect the calibration mic to the ECM-AC1 jack on the rear of the subwoofer, and set it up at the ear level using a tripod, etc. (not supplied). ECM-AC1 TV VIDEO 1 VIDEO 2 AUDIO IN AUDIO IN AUDIO IN TV DIGITAL IN L OPTOCAL R VIDEO 1 DIGITAL IN COAXIAL VIDEO 2 DIGITAL IN COAXIAL Rear of the subwoofer Calibration mic 4 Press X/x to select CALIBRATION]. 1 ( 4 4 ) 3 ( 2 8 ) T 0:03:04 AUTO CALIBRATION START [AUTO DVD VIDEO 5 Press . The [AUTO CALIBRATION] display appears. AUTO CALIBRATION Connect calibration mic. Start measurement? YES NO 6 Press X/x to select [YES], then press to start [AUTO CALIBRATION]. Be quiet during the measurement. Measuring. Please wait a moment. The front of each speaker should face the calibration mic, and there should be no obstruction between the speakers and the calibration mic. Note • Place the calibration mic so that the "FRONT" side of it is pointed toward the front speakers. 2 Press FUNCTION +/- repeatedly until "DVD" appears in the front panel display. 3 Press DISPLAY when the system is in stop mode. The Control Menu appears. Note • Avoid being in the measurement area and making noise during the measurement (about 1 minute), to avoid measurement failure. During the measurement, test signals are output from the speakers. • Reflections from walls or the floor may affect measurements. • When you install the surround speaker (L) to the right position, the system set the "SL SR REVERSE" setting (page 99) to "ON" automatically. 88US
-
 1
1 -
2
-
3
-
4
-
5
-
6
-
7
-
8
-
9
-
10
-
11
-
12
-
13
-
14
-
15
-
16
-
17
-
18
-
19
-
20
-
21
-
22
-
23
-
24
-
25
-
26
-
27
-
28
-
29
-
30
-
31
-
32
-
33
-
34
-
35
-
36
-
37
-
38
-
39
-
40
-
41
-
42
-
43
-
44
-
45
-
46
-
47
-
48
-
49
-
50
-
51
-
52
-
53
-
54
-
55
-
56
-
57
-
58
-
59
-
60
-
61
-
62
-
63
-
64
-
65
-
66
-
67
-
68
-
69
-
70
-
71
-
72
-
73
-
74
-
75
-
76
-
77
-
78
-
79
-
80
-
81
-
82
-
 83
83 -
 84
84 -
 85
85 -
 86
86 -
 87
87 -
 88
88 -
 89
89 -
 90
90 -
 91
91 -
 92
92 -
 93
93 -
94
-
95
-
96
-
97
-
98
-
99
-
100
-
101
-
102
-
103
-
104
-
105
-
106
-
107
-
108
-
109
-
110
-
111
-
112
-
113
-
114
-
115
-
116
-
117
-
118
-
119
-
120
-
121
-
122
-
123
-
124
-
125
-
126
-
127
 |
 |
