Sony DAV-LF1H Operating Instructions - Page 90
Using the Setup Display, SETUP], or [SPEAKER SETUP]. Then
 |
View all Sony DAV-LF1H manuals
Add to My Manuals
Save this manual to your list of manuals |
Page 90 highlights
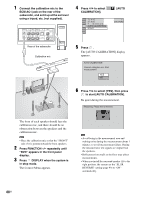
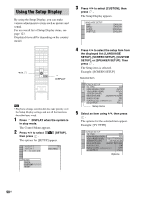
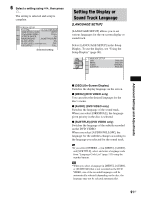
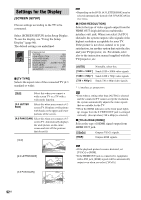
Using the Setup Display By using the Setup Display, you can make various adjustments to items such as picture and sound. For an overall list of Setup Display items, see page 123. Displayed items differ depending on the country model. X/x, DISPLAY Note • Playback settings stored in the disc take priority over the Setup Display settings and not all the functions described may work. 1 Press DISPLAY when the system is in stop mode. The Control Menu appears. 2 Press X/x to select then press . [SETUP], The options for [SETUP] appear. 1 2 ( 2 7 ) 1 8 ( 3 4 ) T 0:00:02 DVD VIDEO QUICK QUICK CUSTOM RESET BNR 3 Press X/x to select [CUSTOM], then press . The Setup Display appears. LANGUAGE SETUP OSD: MENU: AUDIO: SUBTITLE: ENGLISH ENGLISH ORIGINAL ENGLISH 4 Press X/x to select the setup item from the displayed list: [LANGUAGE SETUP], [SCREEN SETUP], [CUSTOM SETUP], or [SPEAKER SETUP]. Then press . The Setup item is selected. Example: [SCREEN SETUP] Selected item SCREEN SETUP TV TYPE: 16:9 HDMI RESOLUTION: AUTO YCBCR/RGB (HDMI): YCBCR SCREEN SAVER: ON BACKGROUND: JACKET PICTURE BLACK LEVEL: ON BLACK LEVEL (COMPONENT OUT): OFF 4:3 OUTPUT: FULL Setup items 5 Select an item using X/x, then press . The options for the selected item appear. Example: [TV TYPE] SCREEN SETUP TV TYPE: 16:9 HDMI RESOLUTION: 16:9 YCBCR/RGB (HDMI): 4:3 LETTER BOX SCREEN SAVER: 4:3 PAN SCAN BACKGROUND: JACKET PICTURE BLACK LEVEL: ON BLACK LEVEL (COMPONENT OUT): OFF 4:3 OUTPUT: FULL Options 90US
-
 1
1 -
2
-
3
-
4
-
5
-
6
-
7
-
8
-
9
-
10
-
11
-
12
-
13
-
14
-
15
-
16
-
17
-
18
-
19
-
20
-
21
-
22
-
23
-
24
-
25
-
26
-
27
-
28
-
29
-
30
-
31
-
32
-
33
-
34
-
35
-
36
-
37
-
38
-
39
-
40
-
41
-
42
-
43
-
44
-
45
-
46
-
47
-
48
-
49
-
50
-
51
-
52
-
53
-
54
-
55
-
56
-
57
-
58
-
59
-
60
-
61
-
62
-
63
-
64
-
65
-
66
-
67
-
68
-
69
-
70
-
71
-
72
-
73
-
74
-
75
-
76
-
77
-
78
-
79
-
80
-
81
-
82
-
83
-
84
-
 85
85 -
 86
86 -
 87
87 -
 88
88 -
 89
89 -
 90
90 -
 91
91 -
 92
92 -
 93
93 -
 94
94 -
 95
95 -
96
-
97
-
98
-
99
-
100
-
101
-
102
-
103
-
104
-
105
-
106
-
107
-
108
-
109
-
110
-
111
-
112
-
113
-
114
-
115
-
116
-
117
-
118
-
119
-
120
-
121
-
122
-
123
-
124
-
125
-
126
-
127
 |
 |
