Sony DCR-PC5 Operating Instructions - Page 80
Monitoring the new recorded sound, Audio dubbing, To play back the sound
 |
View all Sony DCR-PC5 manuals
Add to My Manuals
Save this manual to your list of manuals |
Page 80 highlights
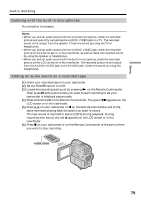
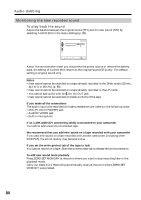
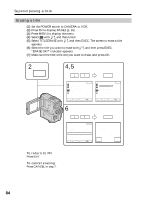
Audio dubbing Monitoring the new recorded sound To play back the sound Adjust the balance between the original sound (ST1) and the new sound (ST2) by selecting AUDIO MIX in the menu settings (p. 89). VCR SET H i F i SOUND AUD I O M I X A/VtDV OUT ST1 EXIT ST2 r R EXEC RET. About five minutes after when you disconnect the power source or remove the battery pack, the setting of AUDIO MIX returns to the original sound (ST1) only. The default setting is original sound only. Notes • New sound cannot be recorded on a tape already recorded in the 16-bit mode (32 kHz, 44.1 kHz or 48 kHz) (p. 89). • New sound cannot be recorded on a tape already recorded in the LP mode. • You cannot add audio with the DV IN/OUT jack. • New sound cannot be recorded on blank portions of the tape. If you make all the connections The audio input to be recorded will take precedence over others in the following order. • MIC (PLUG IN POWER) jack • AUDIO/VIDEO jack • Built-in microphone If an i.LINK cable (DV connecting cable) is connected to your camcorder You cannot add a sound to a recorded tape. We recommend that you add new sound on a tape recorded with your camcorder If you add new sound on a tape recorded with another camcorder (including other DCR-PC5), the sound quality may become worse. If you set the write-protect tab of the tape to lock You cannot record on a tape. Slide the write-protect tab to release the write protection. To add new sound more precisely Press ZERO SET MEMORY at the point where you want to stop recording later in the playback mode. Carry out steps 3 to 5. Recording automatically stops at the point where ZERO SET MEMORY was pressed. 80
-
 1
1 -
2
-
3
-
4
-
5
-
6
-
7
-
8
-
9
-
10
-
11
-
12
-
13
-
14
-
15
-
16
-
17
-
18
-
19
-
20
-
21
-
22
-
23
-
24
-
25
-
26
-
27
-
28
-
29
-
30
-
31
-
32
-
33
-
34
-
35
-
36
-
37
-
38
-
39
-
40
-
41
-
42
-
43
-
44
-
45
-
46
-
47
-
48
-
49
-
50
-
51
-
52
-
53
-
54
-
55
-
56
-
57
-
58
-
59
-
60
-
61
-
62
-
63
-
64
-
65
-
66
-
67
-
68
-
69
-
70
-
71
-
72
-
73
-
74
-
 75
75 -
 76
76 -
 77
77 -
 78
78 -
 79
79 -
 80
80 -
 81
81 -
 82
82 -
 83
83 -
 84
84 -
 85
85 -
86
-
87
-
88
-
89
-
90
-
91
-
92
-
93
-
94
-
95
-
96
-
97
-
98
-
99
-
100
-
101
-
102
-
103
-
104
-
105
-
106
-
107
-
108
-
109
-
110
-
111
-
112
-
113
-
114
-
115
-
116
-
117
-
118
-
119
-
120
-
121
-
122
-
123
-
124
-
125
-
126
-
127
-
128
-
129
-
130
-
131
-
132
-
133
-
134
-
135
-
136
-
137
-
138
-
139
-
140
-
141
-
142
-
143
-
144
-
145
-
146
-
147
-
148
-
149
-
150
-
151
-
152
-
153
-
154
-
155
-
156
 |
 |
