Sony DCRHC21 Operating Guide - Page 33
Fader, End Sch End Search, Exposure, Wht Bal White Balance, - windows 8
 |
UPC - 027242669819
View all Sony DCRHC21 manuals
Add to My Manuals
Save this manual to your list of manuals |
Page 33 highlights
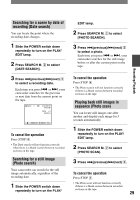
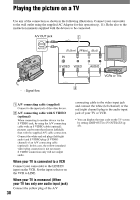
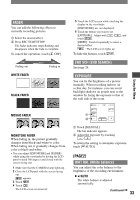
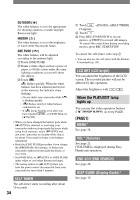
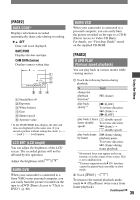
FADER You can add the following effects to currently recording pictures. Select the desired effect. Press REC START/STOP. The fader indicator stops flashing and disappears when the fade is complete. To cancel the operation, touch [ OFF]. Fading out WHITE FADER Fading in BLACK FADER MOSAIC FADER MONOTONE FADER When fading in, the picture gradually changes from black-and-white to color. When fading out, it gradually changes from color to black-and-white. • You can adjust [EXPOSURE] and [FADER] while using the viewfinder by having the LCD panel rotated 180 degrees and closed with the screen facing out. 1 Make sure that the CAMERA lamp lights up. 2 Close the LCD panel with the screen facing out. appears. 3 Touch . 4 Touch . The LCD screen is turned off. 5 Touch the LCD screen while checking the display in the viewfinder. [EXPOSURE], etc. are displayed. 6 Touch the button you want to set. [EXPOSURE] : Adjust with touch . / , and [FADER] : Touch it repeatedly to select a desired effect. : The LCD screen lights up. To hide the buttons, touch . END SCH (END SEARCH) See page 26. EXPOSURE You can fix the brightness of a picture manually. When recording indoors on a clear day, for instance, you can avoid backlight shadows on people next to the window by fixing the exposure to that of the wall side of the room. 60min AUTO STBY 0:00:00 OK 1 MANU- AL 2 EXPOSURE Touch [MANUAL]. The bar indicator appears. Adjust the exposure by touching /. To return the setting to automatic exposure, touch [ AUTO]. [PAGE2] WHT BAL (White balance) You can adjust the color balance to the brightness of the recording environment. AUTO The white balance is adjusted automatically. Continued 33 Using the Menu
-
 1
1 -
2
-
3
-
4
-
5
-
6
-
7
-
8
-
9
-
10
-
11
-
12
-
13
-
14
-
15
-
16
-
17
-
18
-
19
-
20
-
21
-
22
-
23
-
24
-
25
-
26
-
27
-
 28
28 -
 29
29 -
 30
30 -
 31
31 -
 32
32 -
 33
33 -
 34
34 -
 35
35 -
 36
36 -
 37
37 -
 38
38 -
39
-
40
-
41
-
42
-
43
-
44
-
45
-
46
-
47
-
48
-
49
-
50
-
51
-
52
-
53
-
54
-
55
-
56
-
57
-
58
-
59
-
60
-
61
-
62
-
63
-
64
-
65
-
66
-
67
-
68
-
69
-
70
-
71
-
72
-
73
-
74
-
75
-
76
-
77
-
78
-
79
-
80
-
81
-
82
-
83
-
84
-
85
-
86
-
87
-
88
-
89
-
90
-
91
-
92
 |
 |