Sony DCRHC21 Operating Guide - Page 60
Creating a DVD (Direct Access to “Click to DVD - windows xp
 |
UPC - 027242669819
View all Sony DCRHC21 manuals
Add to My Manuals
Save this manual to your list of manuals |
Page 60 highlights
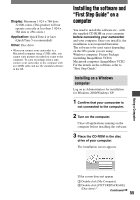
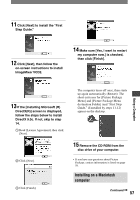
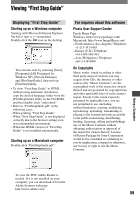
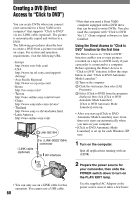
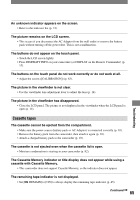
Creating a DVD (Direct Access to "Click to DVD") You can create DVDs when you connect your camcorder to a Sony VAIO series computer* that supports "Click to DVD" via an i.LINK cable (optional). The picture is automatically copied and written to a DVD. The following procedures describe how to create a DVD from a picture recorded on a tape. For system and operation requirements, visit the following URL: - Europe http://www.vaio-link.com/ - USA http://www.ita.sel.sony.com/support/ dvimag/ - Asia Pacific Regional http://www.css.ap.sony.com/ - Korea http://scs.sony.co.kr/ - Taiwan http://vaio-online.sony.com/tw/vaio/ - China http://www.sonystyle.com.cn/vaio/ - Thailand http://www.sony.co.th/vaio/index.html - Latin America http://vaio-online.sony.com/ i.LINK cable (optional) to i.LINK (IEEE1394) connector to DV Interface • You can only use an i.LINK cable for this operation. You cannot use a USB cable. 60 * Note that you need a Sony VAIO computer equipped with a DVD drive that can be used to write DVDs. You also need the computer with "Click to DVD Ver.1.2" (Sony original software) or later installed. Using the Direct Access to "Click to DVD" function for the first time The Direct Access to "Click to DVD" function enables you to copy pictures recorded on a tape to a DVD easily if your camcorder is connected to a computer. Before operating the Direct Access to "Click to DVD" function, follow the steps below to start "Click to DVD Automatic Mode Launcher." Turn on the computer. Click the start menu, then select [All Programs]. Select [Click to DVD] from the programs displayed, then click [Click to DVD Automatic Mode Launcher]. [Click to DVD Automatic Mode Launcher] starts up. • After you start up [Click to DVD Automatic Mode Launcher] once, from then on it starts up automatically when you turn on your computer. • [Click to DVD Automatic Mode Launcher] is set up for each Windows XP user. 1 Turn on the computer. Quit all applications running with an i.LINK. 2 Prepare the power source for your camcorder, then slide the POWER switch down to turn on the PLAY/ EDIT lamp. Use the supplied AC Adaptor as the power source since it takes a few hours
-
 1
1 -
2
-
3
-
4
-
5
-
6
-
7
-
8
-
9
-
10
-
11
-
12
-
13
-
14
-
15
-
16
-
17
-
18
-
19
-
20
-
21
-
22
-
23
-
24
-
25
-
26
-
27
-
28
-
29
-
30
-
31
-
32
-
33
-
34
-
35
-
36
-
37
-
38
-
39
-
40
-
41
-
42
-
43
-
44
-
45
-
46
-
47
-
48
-
49
-
50
-
51
-
52
-
53
-
54
-
 55
55 -
 56
56 -
 57
57 -
 58
58 -
 59
59 -
 60
60 -
 61
61 -
 62
62 -
 63
63 -
 64
64 -
 65
65 -
66
-
67
-
68
-
69
-
70
-
71
-
72
-
73
-
74
-
75
-
76
-
77
-
78
-
79
-
80
-
81
-
82
-
83
-
84
-
85
-
86
-
87
-
88
-
89
-
90
-
91
-
92
 |
 |
