Sony DCRPC110 Operating Instructions - Page 114
Recording a moving picture from other equipment, Recording a picture from a mini DV tape as a moving
 |
UPC - 027242580763
View all Sony DCRPC110 manuals
Add to My Manuals
Save this manual to your list of manuals |
Page 114 highlights
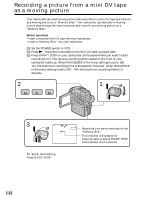
Recording a picture from a mini DV tape as a moving picture Recording a moving picture from other equipment (1) Set the POWER switch to VCR and set DISPLAY in to LCD in the menu settings. (2) Play back the recorded tape, or turn the TV on to see the desired program. The image of the other equipment is displayed on the LCD screen or in the viewfinder. (3) Follow steps 3 on page 112. Using the A/V connecting cable S VIDEO OUT S VIDEO VIDEO AUDIO/VIDEO : Signal flow Connect the yellow plug of the A/V connecting cable to the video jack on the VCR or the TV. If your TV or VCR has an S video jack Connect using an S video cable (not supplied) to obtain high-quality pictures. With this connection, you do not need to connect the yellow (video) plug of the A/V connecting cable. Connect an S video cable (not supplied) to the S video jacks of both your camcorder and the TV or VCR. This connection produces higher quality DV format pictures. Using the i.LINK cable (DV connecting cable) DV S VIDEO LANC DV OUT (not supplied) DV IN/OUT 114 : Signal flow Note The " " flashes in the following instances. If this happens, eject and insert "Memory Stick" again, and record distortion-free images. - When recording on a tape in a poor recording state, for example, on a tape that has been repeatedly used for dubbing - When attempting to input images that are distorted due to poor radio wave reception when a TV tuner unit is in use During recording on "Memory Stick" Do not eject the cassette tape from your camcorder. During ejecting the tape, sound is not recorded on the "Memory Stick."
-
 1
1 -
2
-
3
-
4
-
5
-
6
-
7
-
8
-
9
-
10
-
11
-
12
-
13
-
14
-
15
-
16
-
17
-
18
-
19
-
20
-
21
-
22
-
23
-
24
-
25
-
26
-
27
-
28
-
29
-
30
-
31
-
32
-
33
-
34
-
35
-
36
-
37
-
38
-
39
-
40
-
41
-
42
-
43
-
44
-
45
-
46
-
47
-
48
-
49
-
50
-
51
-
52
-
53
-
54
-
55
-
56
-
57
-
58
-
59
-
60
-
61
-
62
-
63
-
64
-
65
-
66
-
67
-
68
-
69
-
70
-
71
-
72
-
73
-
74
-
75
-
76
-
77
-
78
-
79
-
80
-
81
-
82
-
83
-
84
-
85
-
86
-
87
-
88
-
89
-
90
-
91
-
92
-
93
-
94
-
95
-
96
-
97
-
98
-
99
-
100
-
101
-
102
-
103
-
104
-
105
-
106
-
107
-
108
-
 109
109 -
 110
110 -
 111
111 -
 112
112 -
 113
113 -
 114
114 -
 115
115 -
 116
116 -
 117
117 -
 118
118 -
 119
119 -
120
-
121
-
122
-
123
-
124
-
125
-
126
-
127
-
128
-
129
-
130
-
131
-
132
-
133
-
134
-
135
-
136
-
137
-
138
-
139
-
140
-
141
-
142
-
143
-
144
-
145
-
146
-
147
-
148
-
149
-
150
-
151
-
152
-
153
-
154
-
155
-
156
-
157
-
158
-
159
-
160
-
161
-
162
-
163
-
164
-
165
-
166
-
167
-
168
 |
 |
