Sony DSC-P8 Operating Instructions - Page 29
Select, DSC-P10, P12 or, DSC-P8, on the control button, then press, Select [Date/Time]
 |
View all Sony DSC-P8 manuals
Add to My Manuals
Save this manual to your list of manuals |
Page 29 highlights
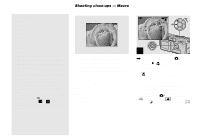
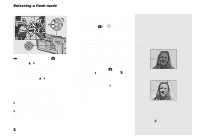
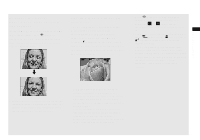
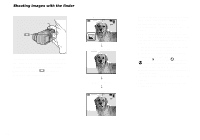
Inserting the date and time on a still image Shooting still images Camera Moving Image: AF Mode: 1 Smart Zoom: Date/Time: 2 Red Eye Reduction: AF Illuminator: MPEG Movie Single On Off Off Auto SELECT Camera Moving Image: AF Mode: 1 Smart Zoom: Date/Time: 2 Red Eye Reduction: AF Illuminator: Day&Time Date Off OK Camera Moving Image: AF Mode: 1 Smart Zoom: Date/Time: 2 Red Eye Reduction: AF Illuminator: MPEG Movie Single On Date Off Auto PAGE SELECT 1 , Set the mode dial to SET UP. The SET UP screen appears. • When images are shot with the date and time superimposed, the date and time cannot be removed later. • The date and time do not appear on the LCD screen during shooting, instead, indicator appears in the upper left corner of the LCD screen. The actual date and time appear in red during playback only. • On DSC-P10/P12, item is displayed as and (page 104). 1 2 2 , Select 1 (Camera1) (DSC-P10/ P12) or (Camera) (DSC-P8) with v on the control button, then press B. Select [Date/Time] with v/V, then press B. • If you select [Date], the date is superimposed onto the image in the order selected in "Setting the date and time" (page 15). 3 , Select the date and time setting with v/V on the control button, then press z. Day & Time: Superimposes the date, hour, and minute onto the image. Date: Superimposes the year, month and day onto the image. Off: Does not superimpose the date and time onto the image. After the setting has been completed, set the mode dial to , and shoot the image. • You can also carry out this operation with the mode dial set to or SCN. • This setting is maintained even when the power is turned off. 29
-
 1
1 -
2
-
3
-
4
-
5
-
6
-
7
-
8
-
9
-
10
-
11
-
12
-
13
-
14
-
15
-
16
-
17
-
18
-
19
-
20
-
21
-
22
-
23
-
 24
24 -
 25
25 -
 26
26 -
 27
27 -
 28
28 -
 29
29 -
 30
30 -
 31
31 -
 32
32 -
 33
33 -
 34
34 -
35
-
36
-
37
-
38
-
39
-
40
-
41
-
42
-
43
-
44
-
45
-
46
-
47
-
48
-
49
-
50
-
51
-
52
-
53
-
54
-
55
-
56
-
57
-
58
-
59
-
60
-
61
-
62
-
63
-
64
-
65
-
66
-
67
-
68
-
69
-
70
-
71
-
72
-
73
-
74
-
75
-
76
-
77
-
78
-
79
-
80
-
81
-
82
-
83
-
84
-
85
-
86
-
87
-
88
-
89
-
90
-
91
-
92
-
93
-
94
-
95
-
96
-
97
-
98
-
99
-
100
-
101
-
102
-
103
-
104
-
105
-
106
-
107
-
108
-
109
-
110
-
111
-
112
-
113
-
114
-
115
-
116
-
117
-
118
-
119
-
120
 |
 |
