Sony DSC-W170/N Cyber-shot® Handbook - Page 104
Using the “Music Transfer” (supplied), Adding/Changing Music using, Music Transfer - reset button
 |
View all Sony DSC-W170/N manuals
Add to My Manuals
Save this manual to your list of manuals |
Page 104 highlights
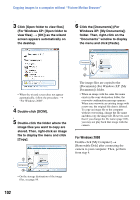
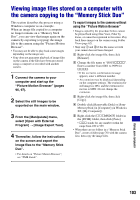
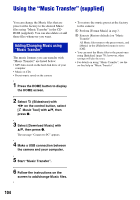
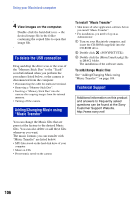
Using the "Music Transfer" (supplied) You can change the Music files that are preset at the factory to the desired Music files using "Music Transfer" in the CDROM (supplied). You can also delete or add these files whenever you want. Adding/Changing Music using "Music Transfer" The music formats you can transfer with "Music Transfer" are listed below: • MP3 files stored on the hard disk drive of your computer • Music on CDs • Preset-music saved on the camera 1 Press the HOME button to display the HOME screen. 2 Select (Slideshow) with b/B on the control button, select [ Music Tool] with v/V, then press z. 3 Select [Download Music] with v/V, then press z. The message "Connect to PC" appears. 4 Make a USB connection between the camera and your computer. 5 Start "Music Transfer". 6 Follow the instructions on the screen to add/change Music files. • To restore the music preset at the factory to the camera: 1 Perform [Format Music] in step 3. 2 Execute [Restore defaults] on "Music Transfer". All Music files return to the preset-music, and [Music] in the [Slideshow] menu is set to [Off]. • You can reset the Music files to the preset ones using [Initialize] (page 79), however, other settings will also be reset. • For details on using "Music Transfer", see the on-line help in "Music Transfer". 104
-
 1
1 -
2
-
3
-
4
-
5
-
6
-
7
-
8
-
9
-
10
-
11
-
12
-
13
-
14
-
15
-
16
-
17
-
18
-
19
-
20
-
21
-
22
-
23
-
24
-
25
-
26
-
27
-
28
-
29
-
30
-
31
-
32
-
33
-
34
-
35
-
36
-
37
-
38
-
39
-
40
-
41
-
42
-
43
-
44
-
45
-
46
-
47
-
48
-
49
-
50
-
51
-
52
-
53
-
54
-
55
-
56
-
57
-
58
-
59
-
60
-
61
-
62
-
63
-
64
-
65
-
66
-
67
-
68
-
69
-
70
-
71
-
72
-
73
-
74
-
75
-
76
-
77
-
78
-
79
-
80
-
81
-
82
-
83
-
84
-
85
-
86
-
87
-
88
-
89
-
90
-
91
-
92
-
93
-
94
-
95
-
96
-
97
-
98
-
 99
99 -
 100
100 -
 101
101 -
 102
102 -
 103
103 -
 104
104 -
 105
105 -
 106
106 -
 107
107 -
 108
108 -
 109
109 -
110
-
111
-
112
-
113
-
114
-
115
-
116
-
117
-
118
-
119
-
120
-
121
-
122
-
123
-
124
-
125
-
126
-
127
-
128
-
129
-
130
-
131
-
132
-
133
-
134
-
135
-
136
-
137
-
138
 |
 |