Sony DSC-WX300 User Guide - Page 114
White Balance, Daylight White as Standard - manual
 |
View all Sony DSC-WX300 manuals
Add to My Manuals
Save this manual to your list of manuals |
Page 114 highlights
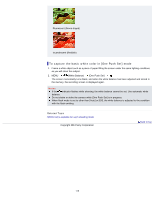
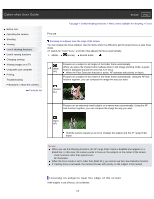
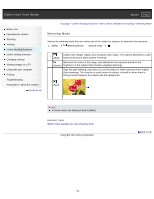
Cyber-shot User Guide Search Print Before Use Operating the camera Shooting Viewing Useful shooting functions Useful viewing functions Changing settings Viewing images on a TV Using with your computer Printing Troubleshooting Precautions / About this camera Contents list Top page > Useful shooting functions > Menu items available for shooting > White Balance White Balance To capture the basic white color in [One Push Set] mode Adjusts color tones according to the surrounding light conditions. Use this function if image color appears unnatural. 1. MENU (White Balance) desired mode (Auto) (Daylight) Adjusts the white balance automatically so that the colors appear natural. Adjusts for outdoors conditions on a fine day, evening views, night scenes, neon signs, fireworks, etc. (Cloudy) Adjusts for a cloudy sky or a shady location. (Fluorescent White Balance 1) (Fluorescent White Balance 2) (Fluorescent White Balance 3) [Fluorescent White Balance 1]: Adjusts for white fluorescent lighting. [Fluorescent White Balance 2]: Adjusts for natural white fluorescent lighting. [Fluorescent White Balance 3]: Adjusts for daylight fluorescent lighting. Adjusts for places under incandescent lamp, or under bright lighting, such as (Incandescent) in a photo studio. (Flash) (One Push) Adjusts for the flash conditions. Adjusts the white balance depending on the light source. Use this mode when [Auto] and other settings don't provide accurate colors. (One Push Set) Memorizes the basic white color which will be used in [One Push] mode. [Details] Effects of lighting conditions The apparent color of the subject is affected by the lighting conditions. The color tones are adjusted automatically, but you can adjust color tones manually using the White Balance function. Daylight (White as Standard) Cloudy (Bluish) 114
-
 1
1 -
2
-
3
-
4
-
5
-
6
-
7
-
8
-
9
-
10
-
11
-
12
-
13
-
14
-
15
-
16
-
17
-
18
-
19
-
20
-
21
-
22
-
23
-
24
-
25
-
26
-
27
-
28
-
29
-
30
-
31
-
32
-
33
-
34
-
35
-
36
-
37
-
38
-
39
-
40
-
41
-
42
-
43
-
44
-
45
-
46
-
47
-
48
-
49
-
50
-
51
-
52
-
53
-
54
-
55
-
56
-
57
-
58
-
59
-
60
-
61
-
62
-
63
-
64
-
65
-
66
-
67
-
68
-
69
-
70
-
71
-
72
-
73
-
74
-
75
-
76
-
77
-
78
-
79
-
80
-
81
-
82
-
83
-
84
-
85
-
86
-
87
-
88
-
89
-
90
-
91
-
92
-
93
-
94
-
95
-
96
-
97
-
98
-
99
-
100
-
101
-
102
-
103
-
104
-
105
-
106
-
107
-
108
-
 109
109 -
 110
110 -
 111
111 -
 112
112 -
 113
113 -
 114
114 -
 115
115 -
 116
116 -
 117
117 -
 118
118 -
 119
119 -
120
-
121
-
122
-
123
-
124
-
125
-
126
-
127
-
128
-
129
-
130
-
131
-
132
-
133
-
134
-
135
-
136
-
137
-
138
-
139
-
140
-
141
-
142
-
143
-
144
-
145
-
146
-
147
-
148
-
149
-
150
-
151
-
152
-
153
-
154
-
155
-
156
-
157
-
158
-
159
-
160
-
161
-
162
-
163
-
164
-
165
-
166
-
167
-
168
-
169
-
170
-
171
-
172
-
173
-
174
-
175
-
176
-
177
-
178
-
179
-
180
-
181
-
182
-
183
-
184
-
185
-
186
-
187
-
188
-
189
-
190
-
191
-
192
-
193
-
194
-
195
-
196
-
197
-
198
-
199
-
200
-
201
-
202
-
203
-
204
-
205
-
206
-
207
-
208
-
209
-
210
-
211
-
212
-
213
-
214
-
215
-
216
-
217
-
218
-
219
-
220
-
221
-
222
-
223
-
224
-
225
-
226
-
227
-
228
-
229
-
230
-
231
-
232
-
233
-
234
-
235
-
236
-
237
-
238
-
239
-
240
-
241
-
242
-
243
-
244
-
245
 |
 |
