Sony DSC-WX300 User Guide - Page 154
Red Eye Reduction, Contents list
 |
View all Sony DSC-WX300 manuals
Add to My Manuals
Save this manual to your list of manuals |
Page 154 highlights
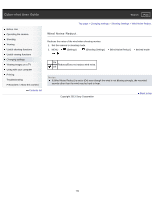
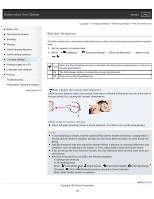
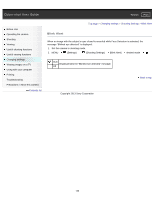
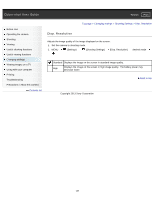
Cyber-shot User Guide Search Print Before Use Operating the camera Shooting Viewing Useful shooting functions Useful viewing functions Changing settings Viewing images on a TV Using with your computer Printing Troubleshooting Precautions / About this camera Contents list Top page > Changing settings > Shooting Settings > Red Eye Reduction Red Eye Reduction The flash strobes two or more times before shooting to reduce the red-eye phenomenon when using the flash. 1. Set the camera to shooting mode. 2. MENU (Settings) (Shooting Settings) [Red Eye Reduction] desired mode Auto When the Face Detection function is activated, the flash strobes automatically to reduce the red-eye phenomenon. On The flash always strobes to reduce the red-eye phenomenon. Off Does not use Red Eye Reduction. What causes the red-eye phenomenon? Pupils become dilated in dark environments. Flash light is reflected off the blood vessels at the back of the eye (retina) (A), causing the "red-eye" phenomenon. Other ways to reduce red-eye Select (High Sensitivity) mode in Scene Selection. (The flash is set to [Off] automatically.) Notes To avoid blurring of images, hold the camera firmly until the shutter is released. It usually takes a second until the shutter is released, and also be sure not to allow the subject to move during this period. Red Eye Reduction may not produce the desired effects. It depends on individual differences and conditions, such as distance to the subject, or if the subject looked away from the pre-strobe. If you do not use the Face Detection function, Red Eye Reduction does not work, even when you select [Auto]. [Red Eye Reduction] is set to [Off] in the following situations: In [Background Defocus] In 3D shooting mode When (Anti Motion Blur), (Night Scene), (Hand-held Twilight), (High Sensitivity), (Gourmet), (Pet) or (Fireworks) mode is selected in Scene Selection. When Smile Shutter function is activated. Copyright 2013 Sony Corporation 154 Back to top
-
 1
1 -
2
-
3
-
4
-
5
-
6
-
7
-
8
-
9
-
10
-
11
-
12
-
13
-
14
-
15
-
16
-
17
-
18
-
19
-
20
-
21
-
22
-
23
-
24
-
25
-
26
-
27
-
28
-
29
-
30
-
31
-
32
-
33
-
34
-
35
-
36
-
37
-
38
-
39
-
40
-
41
-
42
-
43
-
44
-
45
-
46
-
47
-
48
-
49
-
50
-
51
-
52
-
53
-
54
-
55
-
56
-
57
-
58
-
59
-
60
-
61
-
62
-
63
-
64
-
65
-
66
-
67
-
68
-
69
-
70
-
71
-
72
-
73
-
74
-
75
-
76
-
77
-
78
-
79
-
80
-
81
-
82
-
83
-
84
-
85
-
86
-
87
-
88
-
89
-
90
-
91
-
92
-
93
-
94
-
95
-
96
-
97
-
98
-
99
-
100
-
101
-
102
-
103
-
104
-
105
-
106
-
107
-
108
-
109
-
110
-
111
-
112
-
113
-
114
-
115
-
116
-
117
-
118
-
119
-
120
-
121
-
122
-
123
-
124
-
125
-
126
-
127
-
128
-
129
-
130
-
131
-
132
-
133
-
134
-
135
-
136
-
137
-
138
-
139
-
140
-
141
-
142
-
143
-
144
-
145
-
146
-
147
-
148
-
 149
149 -
 150
150 -
 151
151 -
 152
152 -
 153
153 -
 154
154 -
 155
155 -
 156
156 -
 157
157 -
 158
158 -
 159
159 -
160
-
161
-
162
-
163
-
164
-
165
-
166
-
167
-
168
-
169
-
170
-
171
-
172
-
173
-
174
-
175
-
176
-
177
-
178
-
179
-
180
-
181
-
182
-
183
-
184
-
185
-
186
-
187
-
188
-
189
-
190
-
191
-
192
-
193
-
194
-
195
-
196
-
197
-
198
-
199
-
200
-
201
-
202
-
203
-
204
-
205
-
206
-
207
-
208
-
209
-
210
-
211
-
212
-
213
-
214
-
215
-
216
-
217
-
218
-
219
-
220
-
221
-
222
-
223
-
224
-
225
-
226
-
227
-
228
-
229
-
230
-
231
-
232
-
233
-
234
-
235
-
236
-
237
-
238
-
239
-
240
-
241
-
242
-
243
-
244
-
245
 |
 |