Sony DSC-WX300 User Guide - Page 144
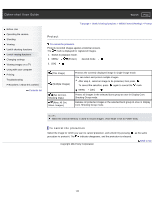
Protect, To cancel the protection
 |
View all Sony DSC-WX300 manuals
Add to My Manuals
Save this manual to your list of manuals |
Page 144 highlights
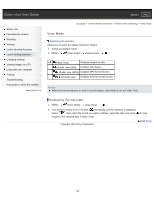
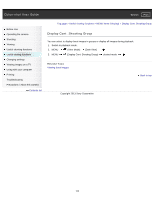
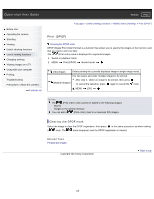
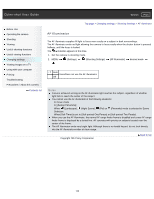
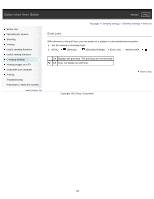
Cyber-shot User Guide Search Print Before Use Operating the camera Shooting Viewing Useful shooting functions Useful viewing functions Changing settings Viewing images on a TV Using with your computer Printing Troubleshooting Precautions / About this camera Contents list Top page > Useful viewing functions > MENU items (Viewing) > Protect Protect To cancel the protection Protects recorded images against accidental erasure. The mark is displayed for registered images. 1. Switch to playback mode. 2. MENU (Protect) desired mode 3. [OK] (This Image) (Multiple Images) (Set All Cont. Shooting Imgs.) (Rmv. All Cnt. Shoot. Images.) Protects the currently displayed image in single-image mode. You can select and protect multiple images. After step 2, select an image to be protected, then press . To cancel the selection, press again to cancel the mark. MENU [OK] Protect all images in the selected burst group at once in Display Cont. Shooting Group mode. Release all protected images in the selected burst group at once in Display Cont. Shooting Group mode. Notes When the internal memory is used to record images, View Mode is set to Folder View. To cancel the protection Select the image for which you want to cancel protection, and unlock it by pressing as the same procedure to protect it. The indicator disappears, and the protection is released. Copyright 2013 Sony Corporation Back to top 144
-
 1
1 -
2
-
3
-
4
-
5
-
6
-
7
-
8
-
9
-
10
-
11
-
12
-
13
-
14
-
15
-
16
-
17
-
18
-
19
-
20
-
21
-
22
-
23
-
24
-
25
-
26
-
27
-
28
-
29
-
30
-
31
-
32
-
33
-
34
-
35
-
36
-
37
-
38
-
39
-
40
-
41
-
42
-
43
-
44
-
45
-
46
-
47
-
48
-
49
-
50
-
51
-
52
-
53
-
54
-
55
-
56
-
57
-
58
-
59
-
60
-
61
-
62
-
63
-
64
-
65
-
66
-
67
-
68
-
69
-
70
-
71
-
72
-
73
-
74
-
75
-
76
-
77
-
78
-
79
-
80
-
81
-
82
-
83
-
84
-
85
-
86
-
87
-
88
-
89
-
90
-
91
-
92
-
93
-
94
-
95
-
96
-
97
-
98
-
99
-
100
-
101
-
102
-
103
-
104
-
105
-
106
-
107
-
108
-
109
-
110
-
111
-
112
-
113
-
114
-
115
-
116
-
117
-
118
-
119
-
120
-
121
-
122
-
123
-
124
-
125
-
126
-
127
-
128
-
129
-
130
-
131
-
132
-
133
-
134
-
135
-
136
-
137
-
138
-
 139
139 -
 140
140 -
 141
141 -
 142
142 -
 143
143 -
 144
144 -
 145
145 -
 146
146 -
 147
147 -
 148
148 -
 149
149 -
150
-
151
-
152
-
153
-
154
-
155
-
156
-
157
-
158
-
159
-
160
-
161
-
162
-
163
-
164
-
165
-
166
-
167
-
168
-
169
-
170
-
171
-
172
-
173
-
174
-
175
-
176
-
177
-
178
-
179
-
180
-
181
-
182
-
183
-
184
-
185
-
186
-
187
-
188
-
189
-
190
-
191
-
192
-
193
-
194
-
195
-
196
-
197
-
198
-
199
-
200
-
201
-
202
-
203
-
204
-
205
-
206
-
207
-
208
-
209
-
210
-
211
-
212
-
213
-
214
-
215
-
216
-
217
-
218
-
219
-
220
-
221
-
222
-
223
-
224
-
225
-
226
-
227
-
228
-
229
-
230
-
231
-
232
-
233
-
234
-
235
-
236
-
237
-
238
-
239
-
240
-
241
-
242
-
243
-
244
-
245
 |
 |