Sony DSC-WX300 User Guide - Page 85
Flash, High Sensitivity mode in Scene Selection. [Off] is
 |
View all Sony DSC-WX300 manuals
Add to My Manuals
Save this manual to your list of manuals |
Page 85 highlights
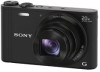
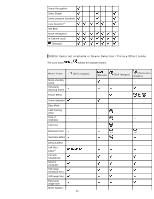
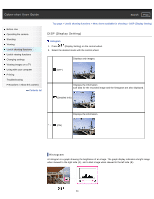
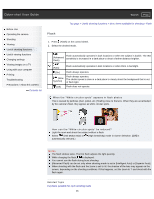
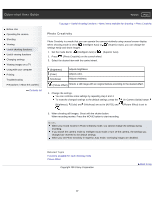
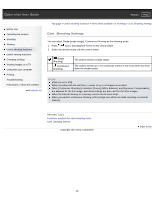
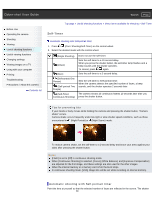
Cyber-shot User Guide Search Print Before Use Operating the camera Shooting Viewing Useful shooting functions Useful viewing functions Changing settings Viewing images on a TV Using with your computer Printing Troubleshooting Precautions / About this camera Contents list Top page > Useful shooting functions > Menu items available for shooting > Flash Flash 1. Press (Flash) on the control wheel. 2. Select the desired mode. Flash automatically operates in dark locations or when the subject is backlit. The ISO (Advanced sensitivity is increased in a dark place to shoot a farther distance brighter. Flash) (Auto) Flash automatically operates in dark locations or when there is backlight. (On) Flash always operates. Flash always operates. (Slow The shutter speed is slow in a dark place to clearly shoot the background that is out Synchro) of flash light. (Off) Flash does not operate. When the "White circular spots" appears in flash photos This is caused by particles (dust, pollen, etc.) floating close to the lens. When they are accentuated by the camera's flash, they appear as white circular spots. How can the "White circular spots" be reduced? Light the room and shoot the subject without a flash. Select (Anti Motion Blur) or (High Sensitivity) mode in Scene Selection. ([Off] is automatically selected.) Notes The flash strobes twice. The first flash adjusts the light quantity. While charging the flash, is displayed. You cannot use the flash during burst shooting. [Advanced Flash] can be set only when shooting mode is set to [Intelligent Auto] or [Superior Auto]. When shooting with the flash and the zoom is set to W, the shadow of the lens may appear on the screen, depending on the shooting conditions. If this happens, set the zoom to T and shoot with the flash again. Related Topic Functions available for each shooting mode 85
-
 1
1 -
2
-
3
-
4
-
5
-
6
-
7
-
8
-
9
-
10
-
11
-
12
-
13
-
14
-
15
-
16
-
17
-
18
-
19
-
20
-
21
-
22
-
23
-
24
-
25
-
26
-
27
-
28
-
29
-
30
-
31
-
32
-
33
-
34
-
35
-
36
-
37
-
38
-
39
-
40
-
41
-
42
-
43
-
44
-
45
-
46
-
47
-
48
-
49
-
50
-
51
-
52
-
53
-
54
-
55
-
56
-
57
-
58
-
59
-
60
-
61
-
62
-
63
-
64
-
65
-
66
-
67
-
68
-
69
-
70
-
71
-
72
-
73
-
74
-
75
-
76
-
77
-
78
-
79
-
 80
80 -
 81
81 -
 82
82 -
 83
83 -
 84
84 -
 85
85 -
 86
86 -
 87
87 -
 88
88 -
 89
89 -
 90
90 -
91
-
92
-
93
-
94
-
95
-
96
-
97
-
98
-
99
-
100
-
101
-
102
-
103
-
104
-
105
-
106
-
107
-
108
-
109
-
110
-
111
-
112
-
113
-
114
-
115
-
116
-
117
-
118
-
119
-
120
-
121
-
122
-
123
-
124
-
125
-
126
-
127
-
128
-
129
-
130
-
131
-
132
-
133
-
134
-
135
-
136
-
137
-
138
-
139
-
140
-
141
-
142
-
143
-
144
-
145
-
146
-
147
-
148
-
149
-
150
-
151
-
152
-
153
-
154
-
155
-
156
-
157
-
158
-
159
-
160
-
161
-
162
-
163
-
164
-
165
-
166
-
167
-
168
-
169
-
170
-
171
-
172
-
173
-
174
-
175
-
176
-
177
-
178
-
179
-
180
-
181
-
182
-
183
-
184
-
185
-
186
-
187
-
188
-
189
-
190
-
191
-
192
-
193
-
194
-
195
-
196
-
197
-
198
-
199
-
200
-
201
-
202
-
203
-
204
-
205
-
206
-
207
-
208
-
209
-
210
-
211
-
212
-
213
-
214
-
215
-
216
-
217
-
218
-
219
-
220
-
221
-
222
-
223
-
224
-
225
-
226
-
227
-
228
-
229
-
230
-
231
-
232
-
233
-
234
-
235
-
236
-
237
-
238
-
239
-
240
-
241
-
242
-
243
-
244
-
245
 |
 |