Sony DSLR-A100K User Guide - Page 125
To cancel the print, To set up using the print menu, finished. appears, press
 |
View all Sony DSLR-A100K manuals
Add to My Manuals
Save this manual to your list of manuals |
Page 125 highlights
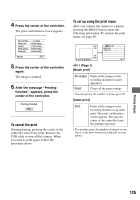
4 Press the center of the controller. The print confirmation screen appears. To set up using the print menu After you connect the camera to a printer, pressing the MENU button opens the following print menu. To operate the print menu, see page 80. 5 Press the center of the controller again. The image is printed. 6 After the message "Printing finished." appears, press the center of the controller. To cancel the print During printing, pressing the center of the controller cancels the print. Remove the USB cable or turn off the camera. When you want to print again, follow the procedure above. 1 (Page 1) [Batch print] All images Prints all the images in the recording medium in equal quantities. Reset Clears all the print settings. • You can specify the number of prints up to 20. [Index print] Start Prints all the images in the recording medium as an index print. The print confirmation screen appears. Pressing the center of the controller starts the printing operation. • For an index print, the number of images on one sheet, or the print format used depends on your printer. Printing images 125
-
 1
1 -
2
-
3
-
4
-
5
-
6
-
7
-
8
-
9
-
10
-
11
-
12
-
13
-
14
-
15
-
16
-
17
-
18
-
19
-
20
-
21
-
22
-
23
-
24
-
25
-
26
-
27
-
28
-
29
-
30
-
31
-
32
-
33
-
34
-
35
-
36
-
37
-
38
-
39
-
40
-
41
-
42
-
43
-
44
-
45
-
46
-
47
-
48
-
49
-
50
-
51
-
52
-
53
-
54
-
55
-
56
-
57
-
58
-
59
-
60
-
61
-
62
-
63
-
64
-
65
-
66
-
67
-
68
-
69
-
70
-
71
-
72
-
73
-
74
-
75
-
76
-
77
-
78
-
79
-
80
-
81
-
82
-
83
-
84
-
85
-
86
-
87
-
88
-
89
-
90
-
91
-
92
-
93
-
94
-
95
-
96
-
97
-
98
-
99
-
100
-
101
-
102
-
103
-
104
-
105
-
106
-
107
-
108
-
109
-
110
-
111
-
112
-
113
-
114
-
115
-
116
-
117
-
118
-
119
-
 120
120 -
 121
121 -
 122
122 -
 123
123 -
 124
124 -
 125
125 -
 126
126 -
 127
127 -
 128
128 -
 129
129 -
 130
130 -
131
-
132
-
133
-
134
-
135
-
136
-
137
-
138
-
139
-
140
-
141
-
142
-
143
-
144
-
145
-
146
-
147
-
148
-
149
-
150
-
151
-
152
-
153
-
154
-
155
-
156
-
157
-
158
-
159
 |
 |
