Sony EVIHD7V Product Manual (HD Color Video Camera) - Page 7
Remote Commander, L/R DIRECTION SET button
 |
View all Sony EVIHD7V manuals
Add to My Manuals
Save this manual to your list of manuals |
Page 7 highlights
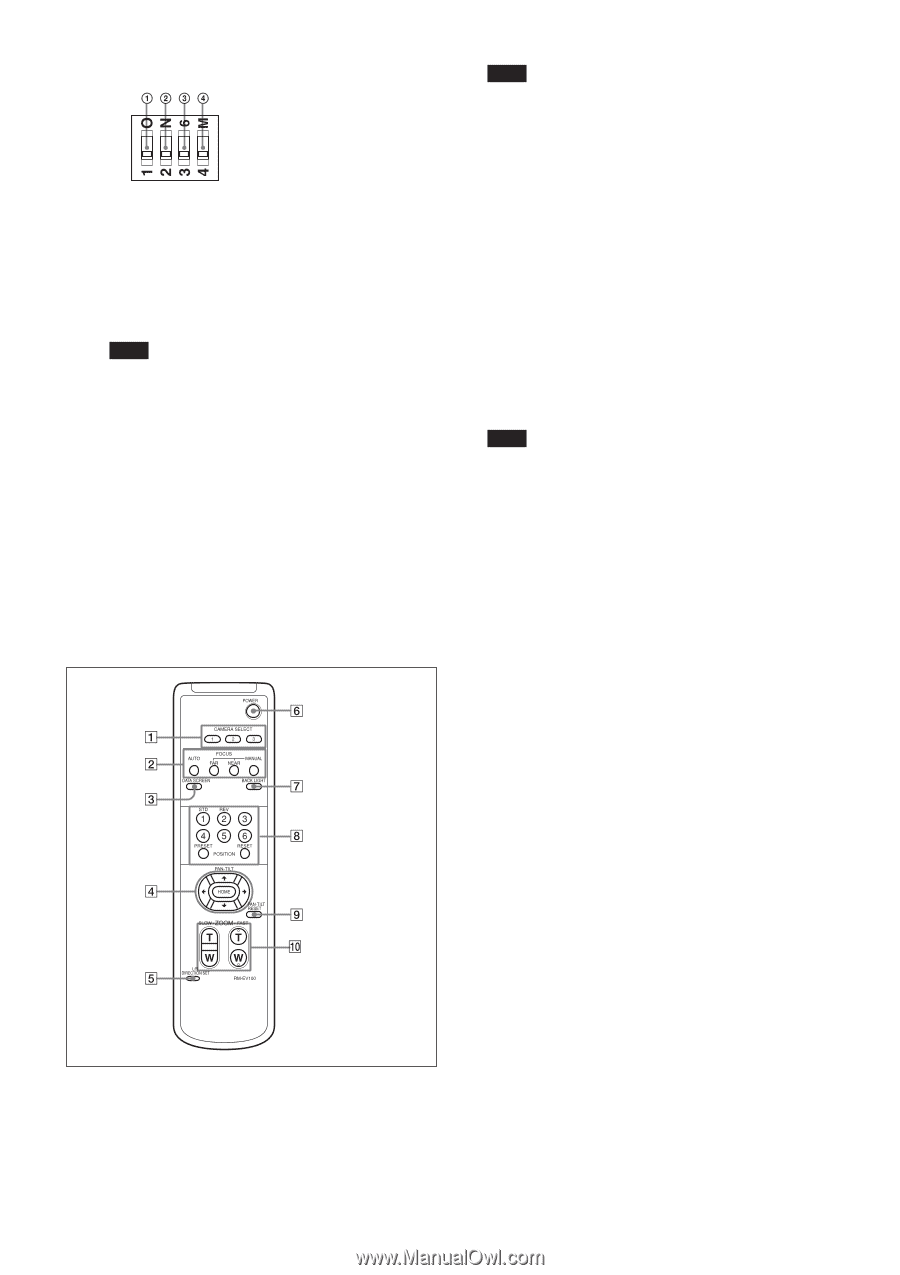
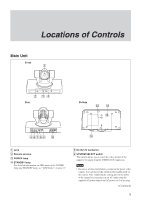
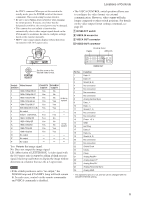
Locations of Controls qa BOTTOM switches 1 Switch 1 (infrared remote commander signal output switch) Set to ON to enable output of the receiver signals, that are transmitted from the Remote Commander, from the VISCA IN connector, or set it to OFF to disable the output. 2 Switch 2 (Communication baud rate selector) Set to ON for 38,400 bps, or OFF for 9,600 bps. Note Set the communication baud rate before turning on the power. If you set the communication baud rate after turning on the power, the setting is ignored. 3 Switch 3 (sync switch) Select whether to add sync to the analog video signals output from the VIDEO OUT connector. Use this when analog input monitors are connected. In particular, add sync during non-HD/-VD connections. 4 Switch 4 (Not used) Be sure to set this switch to OFF. qs Tripod screw hole (1/4-20UNC) qd Fixing screw holes (M3) Remote Commander 1 CAMERA SELECT buttons Press the button corresponding to the camera you want to operate with the Remote Commander. The camera number can be set using the IR SELECT switch on the rear of the camera. Note If two or more cameras are adjacent and have the same camera number, they are operated simultaneously with the same Remote Commander. When you install the cameras close to each other, set different camera numbers. For the camera number setting, see "Operating Multiple Cameras with the Remote Commander" described in the Operating Instructions supplied with the camera. 2 FOCUS buttons Used for focus adjustment. Press the AUTO button to adjust the focus automatically. To adjust the focus manually, press the MANUAL button, and adjust it with the FAR and NEAR buttons. 3 DATA SCREEN button Press this button to display the main menu. Press it again to turn off the menu. If you press the button when a lowerlevel menu is selected, the display goes back to a higherlevel menu. Note Pan/tilt operations are disabled when the menu is displayed. 4 PAN-TILT buttons Press the arrow buttons to perform panning and tilting. Press the HOME button to face the camera back to the front. When the menu is displayed, use V or v to select the menu items and B or b to change the set values. The selected setting menu is displayed, by pressing the HOME button when the main menu is displayed. The Pan/tilt speed will slow down when the camera is zoomed, in order to allow precise positioning. 5 L/R DIRECTION SET button Hold down this button and press the REV button to change the direction of the camera movement opposite to that indicated by the arrow of the B/b buttons. To reset the direction of the camera movement, press the STD button while holding down this button. 6 POWER switch Press this button to turn on/off the camera when the camera is connected to an AC outlet. 7 BACK LIGHT button Press this button to enable the backlight compensation. Press it again to disable the backlight compensation. 8 POSITION buttons Hold down the PRESET button and press button 1 to 6 to store the current camera direction, zooming, focus adjustment and backlight compensation in the memory of the pressed number button. To erase the memory contents, hold down the RESET button and press button 1 to 6. 9 PAN-TILT RESET button Press this button to reset the pan/tilt position. 0 ZOOM buttons Use the SLOW button to zoom slowly, and the FAST button to zoom quickly. Press the T (telephoto) side of the button to zoom in, and the W (wide angle) side to zoom out 7
-
 1
1 -
 2
2 -
 3
3 -
 4
4 -
 5
5 -
 6
6 -
 7
7 -
 8
8 -
 9
9 -
 10
10 -
 11
11 -
 12
12 -
13
-
14
-
15
-
16
-
17
-
18
-
19
-
20
-
21
-
22
-
23
-
24
-
25
-
26
-
27
-
28
-
29
-
30
-
31
-
32
-
33
-
34
-
35
-
36
-
37
-
38
-
39
-
40
 |
 |