Sony F23 Product Manual (F23 Operation Manual 1st edition) - Page 20
Attaching a Lens
 |
View all Sony F23 manuals
Add to My Manuals
Save this manual to your list of manuals |
Page 20 highlights
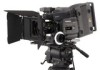
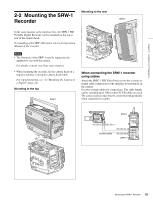
Chapter 2 Installation and Preparations 2-3 Attaching a Lens Use an appropriate optional lens that conforms to the B4 (2/3") lens mount. For information on handling lenses, refer to the lens' operation manual. 1 Pull the lens fixing lever upwards and remove the lens mount cap from the lens mount. VF1 CTRL VF2 LENS 3 2 1 FILTCDABE12345ERC111C53461///6233/LA41620000EP64NN0000ANNKKKKDDRDD LOCK VF MENU/DISPLAY CANCEL/STATU RUN 4 AUBBTLAOKL SET PAGE PRO Lens fixing lever Selecting a lens file If a lens file for the mounted lens has been registered in the built-in memory, specify the file on the subdisplay. For lens file selection on the subdisplay, see "3-2-6 Selection of a Lens File" (page 31). For details on the lens files, see "5-1 File Configuration" (page 78). Adjusting the flange focal length Adjustment of the flange focal length1) is necessary in the following situations: • The first time a lens is attached • When changing lenses • When zooming, and the focus is not sharp at both telephoto and wide angle Note The parts of the lens used in adjusting the flange focal length are in different positions on different lenses. Refer to the lens' operation manual. The procedure for adjusting the flange focal length is as follows: 2 Align the lens' alignment pin with the notch in the upper part of the lens mount and insert the lens (sold separately) into the mount. 3 While supporting the lens, push the lens fixing lever downward to secure the lens. About 3 meters (10 ft) T 1.6 2 2.8 4 5.6 8 11 16 CL ff oo 60 30 20 15 12 10 8 7 6 VF1 CTRL T 1.6 2 ff 2.8 oo 4 60 5.6 VF2 30 8 20 11 15 16 12 10 CL 8 7 56.6 5 LENS 3 2 1 FILTCDABE12345ER111C53461C///6233/AL41620000EP64NN0000ANNKKKKDDRDD LOCK VF MENU/DISPLAY CANCEL/STATU RUN 4 AUBBTLAOKL SET PAGE PRO Notch When a lens with a lens cable has been mounted, connect the cable to the LENS connector located at the lower left of the lens mount. 1 Set the iris control to manual and open the iris fully. 2 Place a flange focal length adjustment chart approximately 3 meters from the camera and adjust the lighting to get an appropriate video output level. 3 Loosen the Ff 2) ring lock screw. 4 With either manual or power zoom, set the zoom ring to telephoto. 5 Aim at the flange focal length adjustment chart and turn the focus ring to focus the image. 6 Set the zoom ring to wide angle. 7 Turn the Ff ring to bring the chart into focus. Take care not to move the distance ring. 20 Attaching a Lens
-
 1
1 -
2
-
3
-
4
-
5
-
6
-
7
-
8
-
9
-
10
-
11
-
12
-
13
-
14
-
 15
15 -
 16
16 -
 17
17 -
 18
18 -
 19
19 -
 20
20 -
 21
21 -
 22
22 -
 23
23 -
 24
24 -
 25
25 -
26
-
27
-
28
-
29
-
30
-
31
-
32
-
33
-
34
-
35
-
36
-
37
-
38
-
39
-
40
-
41
-
42
-
43
-
44
-
45
-
46
-
47
-
48
-
49
-
50
-
51
-
52
-
53
-
54
-
55
-
56
-
57
-
58
-
59
-
60
-
61
-
62
-
63
-
64
-
65
-
66
-
67
-
68
-
69
-
70
-
71
-
72
-
73
-
74
-
75
-
76
-
77
-
78
-
79
-
80
-
81
-
82
-
83
-
84
-
85
-
86
-
87
-
88
-
89
-
90
-
91
-
92
-
93
-
94
-
95
-
96
-
97
-
98
-
99
-
100
-
101
-
102
 |
 |
