Sony F23 Product Manual (F23 Operation Manual 1st edition) - Page 21
Attaching a Viewfinder
 |
View all Sony F23 manuals
Add to My Manuals
Save this manual to your list of manuals |
Page 21 highlights
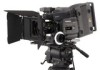
Chapter 2 Installation and Preparations 8 Repeat steps 4 through 7 until the image is focused at both telephoto and wide angle. 9 Tighten the Ff ring lock screw. 1) Flange focal length: The distance between the lens mount attachment plane and the imaging plane 2) Ff: Abbreviation of flange focal length 2-4 Attaching a Viewfinder Note When the viewfinder is attached, do not leave the camera with the eyepiece facing the sun. Direct sunlight can enter through the eyepiece, be focused in the viewfinder and cause fire. For details on the viewfinder, refer to the instruction manual of the viewfinder. 1 If the viewfinder must be attached higher, loosen the two screws, using the 2.5-mm wrench stored in the wrench box (page 14) to detach the viewfinder shoe, and attach it to the upper position using the upper screw holes. VF1 2 Fit the viewfinder to the viewfinder shoe and slide the viewfinder horizontally. The viewfinder stopper automatically pops down. Stopper VF1 CTRL 3 Set the viewfinder to the most convenient position, tighten the viewfinder positioning ring (1 in the figure below), and connect the viewfinder cable to the VF1 connector of the camera (2 in the figure below). 21 Attaching a Viewfinder
-
 1
1 -
2
-
3
-
4
-
5
-
6
-
7
-
8
-
9
-
10
-
11
-
12
-
13
-
14
-
15
-
 16
16 -
 17
17 -
 18
18 -
 19
19 -
 20
20 -
 21
21 -
 22
22 -
 23
23 -
 24
24 -
 25
25 -
 26
26 -
27
-
28
-
29
-
30
-
31
-
32
-
33
-
34
-
35
-
36
-
37
-
38
-
39
-
40
-
41
-
42
-
43
-
44
-
45
-
46
-
47
-
48
-
49
-
50
-
51
-
52
-
53
-
54
-
55
-
56
-
57
-
58
-
59
-
60
-
61
-
62
-
63
-
64
-
65
-
66
-
67
-
68
-
69
-
70
-
71
-
72
-
73
-
74
-
75
-
76
-
77
-
78
-
79
-
80
-
81
-
82
-
83
-
84
-
85
-
86
-
87
-
88
-
89
-
90
-
91
-
92
-
93
-
94
-
95
-
96
-
97
-
98
-
99
-
100
-
101
-
102
 |
 |
