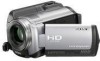
Sony HDRXR100 Operating Guide - Page 13
Getting started, Step 1: Charging the battery pack - light
 |
UPC - 027242765238
View all Sony HDRXR100 manuals
Add to My Manuals
Save this manual to your list of manuals |
Page 13 highlights
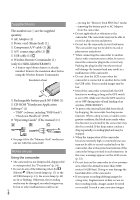
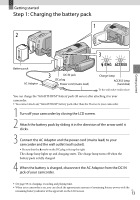
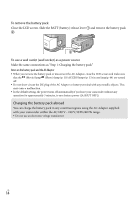
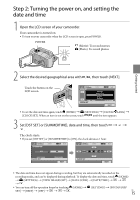
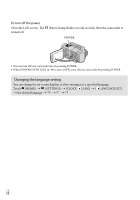
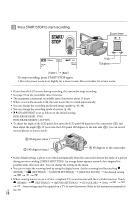
Getting started Step 1: Charging the battery pack Getting started Battery pack AC Adaptor DC IN jack DC plug Power cord (mains lead) Charge lamp ACCESS lamp (hard disk) To the wall outlet (wall socket) You can charge the "InfoLITHIUM" battery pack (H series) after attaching it to your camcorder. You cannot attach any "InfoLITHIUM" battery pack other than the H series to your camcorder. 1 Turn off your camcorder by closing the LCD screen. 2 Attach the battery pack by sliding it in the direction of the arrow until it clicks. 3 Connect the AC Adaptor and the power cord (mains lead) to your camcorder and the wall outlet (wall socket). Be sure that the mark on the DC plug is facing the right. The charge lamp lights up and charging starts. The charge lamp turns off when the battery pack is fully charged. 4 When the battery is charged, disconnect the AC Adaptor from the DC IN jack of your camcorder. See page 58 on charging, recording and playing time. When your camcorder is on, you can check the approximate amount of remaining battery power with the remaining battery indicator at the upper left on the LCD screen. US 13
-
 1
1 -
2
-
3
-
4
-
5
-
6
-
7
-
 8
8 -
 9
9 -
 10
10 -
 11
11 -
 12
12 -
 13
13 -
 14
14 -
 15
15 -
 16
16 -
 17
17 -
 18
18 -
19
-
20
-
21
-
22
-
23
-
24
-
25
-
26
-
27
-
28
-
29
-
30
-
31
-
32
-
33
-
34
-
35
-
36
-
37
-
38
-
39
-
40
-
41
-
42
-
43
-
44
-
45
-
46
-
47
-
48
-
49
-
50
-
51
-
52
-
53
-
54
-
55
-
56
-
57
-
58
-
59
-
60
-
61
-
62
-
63
-
64
-
65
-
66
-
67
-
68
-
69
-
70
-
71
-
72
-
73
-
74
-
75
-
76
-
77
-
78
-
79
-
80
-
81
-
82
-
83
-
84
-
85
-
86
-
87
-
88
-
89
-
90
-
91
-
92
-
93
-
94
-
95
-
96
-
97
-
98
-
99
-
100
-
101
-
102
-
103
-
104
-
105
-
106
-
107
-
108
-
109
-
110
-
111
-
112
-
113
-
114
-
115
-
116
-
117
-
118
-
119
-
120
-
121
-
122
-
123
-
124
-
125
-
126
-
127
-
128
-
129
-
130
 |
 |
