Sony HVRZ7P Operating Guide - Page 30
Adjusting the exposure, To adjust the iris automatically, Adjusting the iris
 |
View all Sony HVRZ7P manuals
Add to My Manuals
Save this manual to your list of manuals |
Page 30 highlights
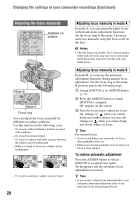
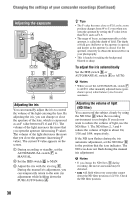
Changing the settings of your camcorder recordings (Continued) Adjusting the exposure IRIS MAN AUTO PUSH AUTO WT SHUTTER GAIN WHT BAL SPEED AUTO MANUAL L B M A H PRESET SEL / PUSH EXEC MENU Adjusting the iris You can manually adjust the iris to control the volume of the light entering the lens. By adjusting the iris, you can change or close the aperture of the lens, which is expressed as an F value between F1.6 and F11. The volume of the light increases the more that you open the aperture (decreasing F value). The volume of the light decreases the more that you close the aperture (increasing F value). The current F value appears on the screen. 1 During recording or standby, set the AUTO/MANUAL switch F to MANUAL. 2 Set the IRIS switch B to MAN. 3 Adjust the iris with the iris ring C. During the manual iris adjustment, you can temporarily return to the auto iris adjustment while holding down the PUSH AUTO button A. z Tips • The F value becomes close to F2.0 as the zoom position changes from W to T even when you open the aperture by setting the F value lower than F2.0, such as F1.6. • The range of focus, an important effect of the aperture, is called the depth of field. The depth of field gets shallower as the aperture is opened, and deeper as the aperture is closed. Use the aperture creatively to obtain the desired effect in your photography. • This is handy for making the background blurred or sharp. To adjust the iris automatically Set the IRIS switch B or AUTO/MANUAL switch F to AUTO. b Notes • When you set the AUTO/MANUAL switch F to AUTO, other manually adjusted items (gain, shutter speed, white balance) also become automatic. . Adjusting the volume of light (ND filter) You can record the subject clearly by using the ND filter D when the recording environment is too bright. If you do not want to reduce the volume of light, use the ND filter 1. The ND filters 2, 3 and 4 reduce the volume of light to about 1/4, 1/16 and 1/64, respectively. If the ND icon flashes during the iris automatic adjustment, set the ND filter D to the position that the icon indicates. The ND icon does not flash during the manual iris adjustment. b Notes • If you change the ND filters D during recording, the movie and sound may be distorted. • will flash when your camcorder cannot detect the ND filter positions (1/2/3/4). Check the ND filter position. 30
-
 1
1 -
2
-
3
-
4
-
5
-
6
-
7
-
8
-
9
-
10
-
11
-
12
-
13
-
14
-
15
-
16
-
17
-
18
-
19
-
20
-
21
-
22
-
23
-
24
-
 25
25 -
 26
26 -
 27
27 -
 28
28 -
 29
29 -
 30
30 -
 31
31 -
 32
32 -
 33
33 -
 34
34 -
 35
35 -
36
-
37
-
38
-
39
-
40
-
41
-
42
-
43
-
44
-
45
-
46
-
47
-
48
-
49
-
50
-
51
-
52
-
53
-
54
-
55
-
56
-
57
-
58
-
59
-
60
-
61
-
62
-
63
-
64
-
65
-
66
-
67
-
68
-
69
-
70
-
71
-
72
-
73
-
74
-
75
-
76
-
77
-
78
-
79
-
80
-
81
-
82
-
83
-
84
-
85
-
86
-
87
-
88
-
89
-
90
-
91
-
92
-
93
-
94
-
95
-
96
-
97
-
98
-
99
-
100
-
101
-
102
-
103
-
104
-
105
-
106
-
107
-
108
-
109
-
110
-
111
-
112
-
113
-
114
-
115
-
116
-
117
-
118
-
119
-
120
-
121
-
122
-
123
-
124
-
125
-
126
-
127
-
128
-
129
-
130
-
131
-
132
-
133
-
134
-
135
-
136
-
137
-
138
-
139
-
140
-
141
-
142
-
143
 |
 |
