Sony HVRZ7P Operating Guide - Page 33
Adjusting the black balance, Customizing the picture quality (Picture profile)
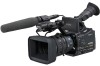 |
View all Sony HVRZ7P manuals
Add to My Manuals
Save this manual to your list of manuals |
Page 33 highlights
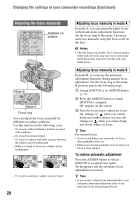
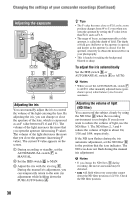
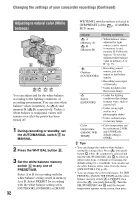
the dial to set the temperature. You can also set the color temperature from the menu ([WB TEMP SET] p. 69). To save the adjusted white balance value in memory A or B 1 Set the white balance memory switch to A ( A) or B ( B) in step 3 of "Adjusting to natural color (White balance)." 2 Capture a white subject, such as white paper, full-screen in the same lighting condition as the one in which the subject is. 3 Press (one push) button C. A or B starts flashing rapidly. It will stay on when the white balance adjustment is completed and the adjusted value is stored in A or B. To adjust the white balance automatically Press the WHT BAL button B or set the AUTO/MANUAL switch E to AUTO. b Notes • When you set the AUTO/MANUAL switch E to AUTO, other manual adjustments (iris, gain, and shutter speed) also become automatic. Adjusting the black balance Normally, you do not need to adjust the black balance. The black balance may become off in some recording conditions. If that happens, adjust the black balance. The adjusted settings are stored only temporarily. The settings return to the default settings when you turn the power off and back on. 1 Press the MENU button during standby. 2 Select [BLK BALANCE] in the (CAMERA SET) menu with the SEL/PUSH EXEC dial. 3 Select [YES] with the SEL/PUSH EXEC dial. The black balance adjustment starts. It will take about 15 seconds. 4 When [Completed.] appears on the screen, press the MENU button to end this menu. If the black balance adjustment fails Check that the iris is closed, then try the adjustment again. b Notes • When using a non-Carl Zeiss lens, close the iris prior to the adjustment. Customizing the picture quality (Picture profile) SEL / PUSH EXEC PICTURE STATUS MENU PROFILE CHECK A B Continued , 33 Recording/Playback
-
 1
1 -
2
-
3
-
4
-
5
-
6
-
7
-
8
-
9
-
10
-
11
-
12
-
13
-
14
-
15
-
16
-
17
-
18
-
19
-
20
-
21
-
22
-
23
-
24
-
25
-
26
-
27
-
 28
28 -
 29
29 -
 30
30 -
 31
31 -
 32
32 -
 33
33 -
 34
34 -
 35
35 -
 36
36 -
 37
37 -
 38
38 -
39
-
40
-
41
-
42
-
43
-
44
-
45
-
46
-
47
-
48
-
49
-
50
-
51
-
52
-
53
-
54
-
55
-
56
-
57
-
58
-
59
-
60
-
61
-
62
-
63
-
64
-
65
-
66
-
67
-
68
-
69
-
70
-
71
-
72
-
73
-
74
-
75
-
76
-
77
-
78
-
79
-
80
-
81
-
82
-
83
-
84
-
85
-
86
-
87
-
88
-
89
-
90
-
91
-
92
-
93
-
94
-
95
-
96
-
97
-
98
-
99
-
100
-
101
-
102
-
103
-
104
-
105
-
106
-
107
-
108
-
109
-
110
-
111
-
112
-
113
-
114
-
115
-
116
-
117
-
118
-
119
-
120
-
121
-
122
-
123
-
124
-
125
-
126
-
127
-
128
-
129
-
130
-
131
-
132
-
133
-
134
-
135
-
136
-
137
-
138
-
139
-
140
-
141
-
142
-
143
 |
 |
