Sony PCGA UVC11A Operating Instructions - Page 15
When you cannot mount directly, Using the mounting adapter - usb
 |
UPC - 027242649156
View all Sony PCGA UVC11A manuals
Add to My Manuals
Save this manual to your list of manuals |
Page 15 highlights
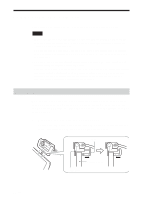
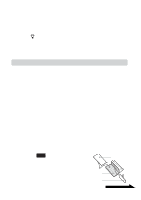
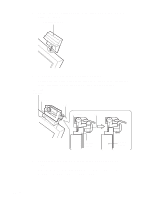
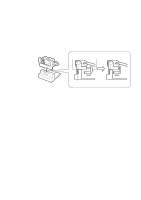
2 Connect the camera USB cable to the computer's USB connector. Refer to the operating instructions manual that came with your computer or the electronic manual to locate the position of the USB connector on your computer. z Hint Depending on the type of computer you use, this camera sometimes cannot be connected directly. If that is the case, see the section "When you cannot mount directly" below for details. When you cannot mount directly If the camera cannot be mounted directly by its arm, mount the camera using one of the steps outlined below. • Using the mounting adapter (see page 15) • Fastening using an adhesive sheet (see page 17) • Setting horizontally (see page 18) • Attaching the camera to a tripod (see page 19) Using the mounting adapter If your computer does not allow the camera to be mounted directly because the display panel is too thick, then the camera cannot be mounted using its arm. In this case, use the mounting adapter and adhesive sheet (large and medium) as shown below. 1 Apply the adhesive sheet (large and medium) to the mounting adapter. Peel off the cover of the two sided tape and apply the adhesive sheet (large and medium) to the mounting adapter. Then, peel off the protective cover on the top of the adhesive sheet. Note When applying the adhesive sheet to the mounting adapter, make sure that the camera and the mounting adapter are free of dust and dirt. Mounting adapter Adhesive sheet (large) Adhesive sheet (medium) Continued on next page 15 GB
-
 1
1 -
2
-
3
-
4
-
5
-
6
-
7
-
8
-
9
-
 10
10 -
 11
11 -
 12
12 -
 13
13 -
 14
14 -
 15
15 -
 16
16 -
 17
17 -
 18
18 -
 19
19 -
 20
20 -
21
-
22
-
23
-
24
-
25
-
26
-
27
-
28
-
29
-
30
-
31
-
32
-
33
-
34
-
35
-
36
-
37
-
38
-
39
-
40
-
41
-
42
-
43
-
44
-
45
-
46
-
47
-
48
-
49
-
50
-
51
-
52
-
53
-
54
-
55
-
56
-
57
-
58
-
59
-
60
-
61
-
62
-
63
-
64
-
65
-
66
-
67
-
68
-
69
-
70
-
71
-
72
-
73
-
74
-
75
-
76
-
77
-
78
-
79
-
80
-
81
-
82
-
83
-
84
-
85
-
86
-
87
-
88
-
89
-
90
-
91
-
92
-
93
-
94
-
95
-
96
-
97
-
98
-
99
-
100
-
101
-
102
-
103
-
104
-
105
-
106
-
107
-
108
-
109
-
110
-
111
-
112
-
113
-
114
-
115
-
116
-
117
-
118
-
119
-
120
-
121
-
122
-
123
-
124
-
125
-
126
-
127
-
128
 |
 |