Sony PCGA UVC11A Operating Instructions - Page 8
Checking that the driver is installed, Double-click System. - drivers
 |
UPC - 027242649156
View all Sony PCGA UVC11A manuals
Add to My Manuals
Save this manual to your list of manuals |
Page 8 highlights
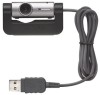
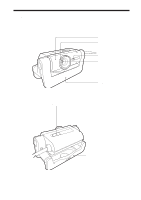
3 Make sure that the software that you want to install is selected, and then click "Next". z Hint If the software is already installed, the check box does not appear. 4 Follow the on-screen instructions. Click "Next" or "Previous" until the setup finishes and the display closes. z Hint When the installation is complete, a message prompting you to restart your computer may appear. If it does, click "Yes". 5 Connect the camera to your computer. The necessary driver and software are automatically installed. If the message prompting you to restart your computer appears, click "Yes". After your Windows operating system restarts, you can begin using the camera. Checking that the driver is installed 1 Connect the camera to your computer. For connection details, see "Connecting the Camera" (page 14). 2 With the Windows XP operating system, click "Start", right-click "My Computer", and then click "Properties". The "System Properties" dialog box appears. Go to Step 4. For operating systems other than the Windows XP operating system, click "Start", point to "Settings", and then click "Control Panel". "Control Panel" appears. 3 Double-click "System". The "System Properties" dialog box appears. 4 Click the "Hardware" tab, and then click the "Device Manager" button. Your operating system may require you to click the "Device Manager" tab. The "Device Manager" window appears. 8 GB
-
 1
1 -
2
-
 3
3 -
 4
4 -
 5
5 -
 6
6 -
 7
7 -
 8
8 -
 9
9 -
 10
10 -
 11
11 -
 12
12 -
 13
13 -
14
-
15
-
16
-
17
-
18
-
19
-
20
-
21
-
22
-
23
-
24
-
25
-
26
-
27
-
28
-
29
-
30
-
31
-
32
-
33
-
34
-
35
-
36
-
37
-
38
-
39
-
40
-
41
-
42
-
43
-
44
-
45
-
46
-
47
-
48
-
49
-
50
-
51
-
52
-
53
-
54
-
55
-
56
-
57
-
58
-
59
-
60
-
61
-
62
-
63
-
64
-
65
-
66
-
67
-
68
-
69
-
70
-
71
-
72
-
73
-
74
-
75
-
76
-
77
-
78
-
79
-
80
-
81
-
82
-
83
-
84
-
85
-
86
-
87
-
88
-
89
-
90
-
91
-
92
-
93
-
94
-
95
-
96
-
97
-
98
-
99
-
100
-
101
-
102
-
103
-
104
-
105
-
106
-
107
-
108
-
109
-
110
-
111
-
112
-
113
-
114
-
115
-
116
-
117
-
118
-
119
-
120
-
121
-
122
-
123
-
124
-
125
-
126
-
127
-
128
 |
 |
