Sony PCGA UVC11A Operating Instructions - Page 24
If you cannot record with the camera microphone, Click Start, and then click Control Panel. - xp driver
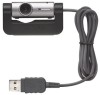 |
UPC - 027242649156
View all Sony PCGA UVC11A manuals
Add to My Manuals
Save this manual to your list of manuals |
Page 24 highlights
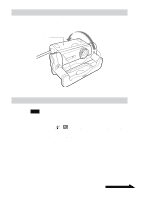
3 Select "Sony PCGA-UVC11" in the Mixer device list, and then click "OK". The "Capture" dialog box appears. z Hint If the "Capture" dialog box does not appear, the driver may not be properly installed. See "Checking that the driver is installed" (page 8), and check whether the driver is properly installed. 4 Make sure that audio input from the camera microphone is enabled. Make sure that the "Mute all" check box is not selected. If it is, clear it. 5 Adjust the volume of camera microphone input. Move the slider for the controller in step 4 to adjust the volume. Make a video or audio recording using your software. If the audio plays back correctly, the settings are complete. If you cannot record with the camera microphone Depending on your software, you may have to set the audio input device manually. Follow the procedures below to set audio input device to the camera microphone, according to your operating system. z Hint If you are using the Network Smart Capture software, you do not need to perform the procedures below. With the Windows XP operating system 1 Click "Start", and then click "Control Panel". "Control Panel" appears. 2 Click "Sounds, Speech and Audio Devices". The "Sounds, Speech, and Audio Devices" window appears. 3 Click "Sounds and Audio Devices". The "Sounds and Audio Devices Properties" dialog box appears. 24 GB
-
 1
1 -
2
-
3
-
4
-
5
-
6
-
7
-
8
-
9
-
10
-
11
-
12
-
13
-
14
-
15
-
16
-
17
-
18
-
 19
19 -
 20
20 -
 21
21 -
 22
22 -
 23
23 -
 24
24 -
 25
25 -
 26
26 -
 27
27 -
 28
28 -
 29
29 -
30
-
31
-
32
-
33
-
34
-
35
-
36
-
37
-
38
-
39
-
40
-
41
-
42
-
43
-
44
-
45
-
46
-
47
-
48
-
49
-
50
-
51
-
52
-
53
-
54
-
55
-
56
-
57
-
58
-
59
-
60
-
61
-
62
-
63
-
64
-
65
-
66
-
67
-
68
-
69
-
70
-
71
-
72
-
73
-
74
-
75
-
76
-
77
-
78
-
79
-
80
-
81
-
82
-
83
-
84
-
85
-
86
-
87
-
88
-
89
-
90
-
91
-
92
-
93
-
94
-
95
-
96
-
97
-
98
-
99
-
100
-
101
-
102
-
103
-
104
-
105
-
106
-
107
-
108
-
109
-
110
-
111
-
112
-
113
-
114
-
115
-
116
-
117
-
118
-
119
-
120
-
121
-
122
-
123
-
124
-
125
-
126
-
127
-
128
 |
 |