Sony PCV-R522DS Online Help Center (VAIO User Guide) - Page 135
Using the Wheel Mouse, Then click OK.
 |
View all Sony PCV-R522DS manuals
Add to My Manuals
Save this manual to your list of manuals |
Page 135 highlights
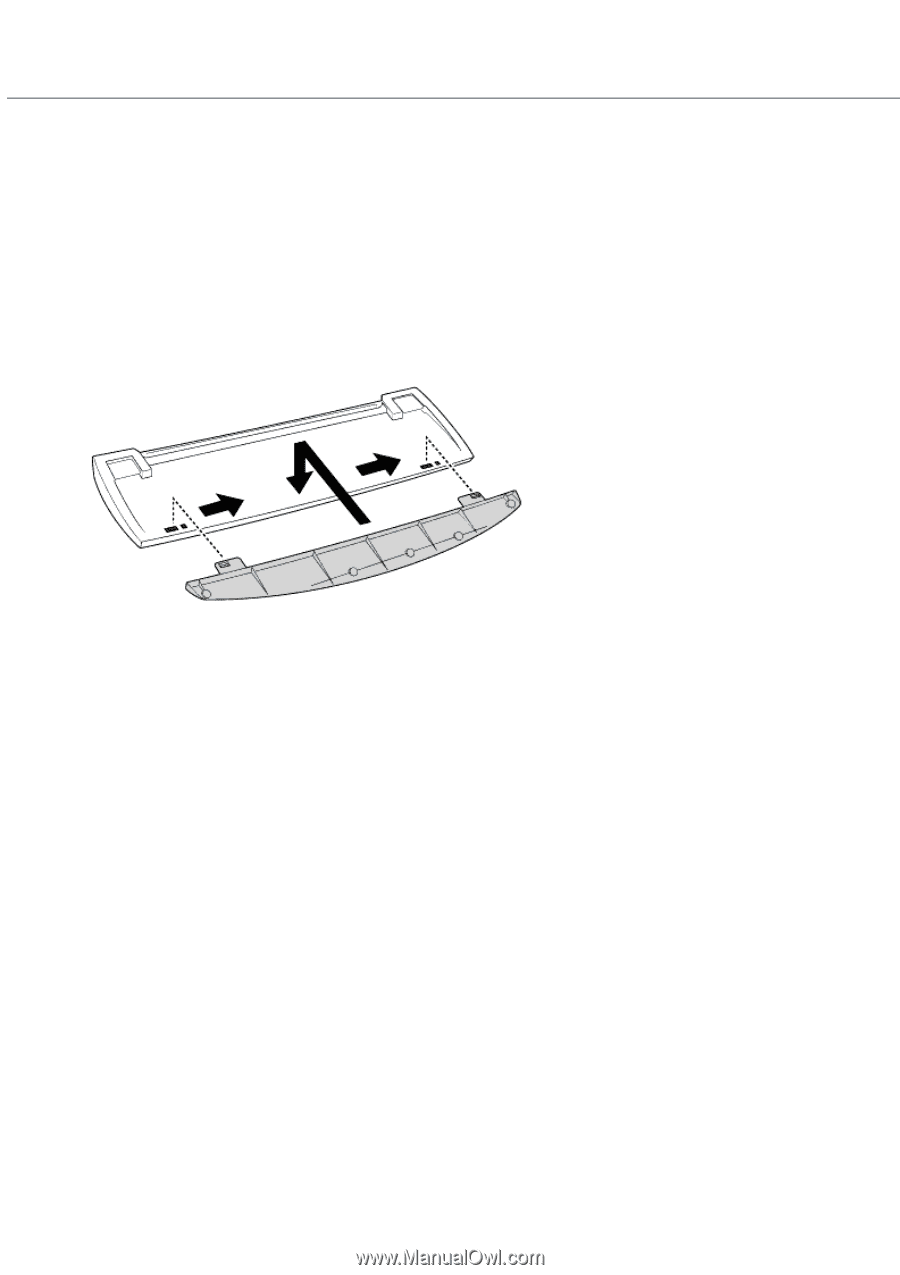
Using the VAIO Smart Keyboard and the Wheel Mouse Connecting the Optional Palmrest The keyboard that comes with your computer is equipped with an optional palmrest that you can attach to your keyboard. Follow these steps to connect the palmrest. 1. Place the keyboard and palmrest upside down on a flat surface. 2. Insert the latching posts on the palmrest into the openings on the keyboard. 3. Move the palmrest to the right until you feel it snap into place. Do not keep your wrists on the palmrest while typing; use the palmrest briefly only when resting. 3. To remove the palmrest 1. Turn the keyboard and palmrest upside down. 2. Push down on the palmrest, and then move it to the left. 3. Lift the palmrest away from the keyboard. Changing the Function of the Programmable Buttons The six programmable buttons along the top of the keyboard are preprogrammed to perform specific functions. You can change the function of the programmable buttons as follows: 1. Click the Start button on the Windows taskbar to open the Start menu. 2. Point to Programs and click VAIO SmartTM Keyboard. Alternatively, you can click the VAIO Smart Keyboard icon in the Windows task tray. 3. Click the on-screen button that represents the button on the keyboard (S1 to S6) that you want to program. 4. Complete the Customization dialog box to specify the function and label you want to assign to the button. Then click OK. Alternatively, you can drag and drop any Windows icon that represents the function you want to assign onto the on-screen button. However, you cannot drag and drop icons that are specific to the Windows operating system, such as My Computer. 5. Close the Customization dialog box. Using the Wheel Mouse For information about the Wheel Mouse that connects to either side of your keyboard, see MouseWare Help. To access MouseWare Help, from the Start menu, point to Programs, MouseWare, and then click MouseWare Help. You can also access MouseWare Help by right-clicking the Mouse icon in the task tray at the bottom right corner Poafgyeou1r35
-
 1
1 -
2
-
3
-
4
-
5
-
6
-
7
-
8
-
9
-
10
-
11
-
12
-
13
-
14
-
15
-
16
-
17
-
18
-
19
-
20
-
21
-
22
-
23
-
24
-
25
-
26
-
27
-
28
-
29
-
30
-
31
-
32
-
33
-
34
-
35
-
36
-
37
-
38
-
39
-
40
-
41
-
42
-
43
-
44
-
45
-
46
-
47
-
48
-
49
-
50
-
51
-
52
-
53
-
54
-
55
-
56
-
57
-
58
-
59
-
60
-
61
-
62
-
63
-
64
-
65
-
66
-
67
-
68
-
69
-
70
-
71
-
72
-
73
-
74
-
75
-
76
-
77
-
78
-
79
-
80
-
81
-
82
-
83
-
84
-
85
-
86
-
87
-
88
-
89
-
90
-
91
-
92
-
93
-
94
-
95
-
96
-
97
-
98
-
99
-
100
-
101
-
102
-
103
-
104
-
105
-
106
-
107
-
108
-
109
-
110
-
111
-
112
-
113
-
114
-
115
-
116
-
117
-
118
-
119
-
120
-
121
-
122
-
123
-
124
-
125
-
126
-
127
-
128
-
129
-
 130
130 -
 131
131 -
 132
132 -
 133
133 -
 134
134 -
 135
135 -
 136
136 -
 137
137 -
 138
138 -
 139
139 -
 140
140 -
141
-
142
-
143
-
144
-
145
-
146
-
147
-
148
-
149
-
150
-
151
-
152
-
153
-
154
-
155
-
156
-
157
-
158
-
159
-
160
-
161
-
162
-
163
-
164
-
165
-
166
-
167
-
168
-
169
-
170
-
171
-
172
-
173
-
174
-
175
-
176
-
177
-
178
-
179
-
180
-
181
-
182
-
183
-
184
-
185
-
186
-
187
-
188
-
189
-
190
-
191
-
192
-
193
-
194
-
195
-
196
-
197
-
198
-
199
-
200
-
201
-
202
-
203
-
204
-
205
-
206
-
207
-
208
-
209
-
210
-
211
-
212
-
213
-
214
-
215
-
216
-
217
-
218
-
219
-
220
-
221
-
222
-
223
-
224
-
225
-
226
-
227
-
228
-
229
-
230
-
231
-
232
-
233
-
234
-
235
-
236
-
237
-
238
-
239
-
240
-
241
-
242
-
243
-
244
-
245
 |
 |