Sony PCV-R522DS Online Help Center (VAIO User Guide) - Page 241
Adding Memory
 |
View all Sony PCV-R522DS manuals
Add to My Manuals
Save this manual to your list of manuals |
Page 241 highlights
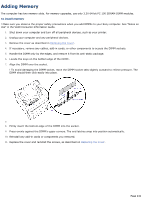
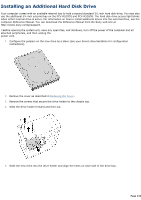
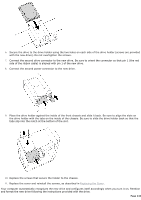
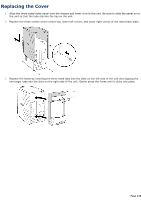
Adding Memory The computer has two memory slots. For memory upgrades, use only 3.3V 64-bit PC-100 SDRAM DIMM modules. To install memory ! Make sure you observe the proper safety precautions when you add DIMMs to your Sony computer. See "Notes on Use" in the VAIO Consumer Information Guide. 1. Shut down your computer and turn off all peripheral devices, such as your printer. 2. Unplug your computer and any peripheral devices. 3. Remove the cover as described in Removing the Cover. 4. If necessary, remove any cables, add-in cards, or other components to access the DIMM sockets. 5. Handle the DIMM only by the edges, and remove it from its anti-static package. 6. Locate the keys on the bottom edge of the DIMM . 7. Align the DIMM over the socket. ! To avoid damaging the DIMM socket, move the DIMM socket tabs slightly outward to relieve pressure. The DIMM should then click easily into place. 7. 8. Firmly insert the bottom edge of the DIMM into the socket. 9. Press evenly against the DIMM's upper corners. The end latches snap into position automatically. 10. Reinstall any add-in cards or components you removed. 11. Replace the cover and reinstall the screws, as described on Replacing the Cover. Page 241
-
 1
1 -
2
-
3
-
4
-
5
-
6
-
7
-
8
-
9
-
10
-
11
-
12
-
13
-
14
-
15
-
16
-
17
-
18
-
19
-
20
-
21
-
22
-
23
-
24
-
25
-
26
-
27
-
28
-
29
-
30
-
31
-
32
-
33
-
34
-
35
-
36
-
37
-
38
-
39
-
40
-
41
-
42
-
43
-
44
-
45
-
46
-
47
-
48
-
49
-
50
-
51
-
52
-
53
-
54
-
55
-
56
-
57
-
58
-
59
-
60
-
61
-
62
-
63
-
64
-
65
-
66
-
67
-
68
-
69
-
70
-
71
-
72
-
73
-
74
-
75
-
76
-
77
-
78
-
79
-
80
-
81
-
82
-
83
-
84
-
85
-
86
-
87
-
88
-
89
-
90
-
91
-
92
-
93
-
94
-
95
-
96
-
97
-
98
-
99
-
100
-
101
-
102
-
103
-
104
-
105
-
106
-
107
-
108
-
109
-
110
-
111
-
112
-
113
-
114
-
115
-
116
-
117
-
118
-
119
-
120
-
121
-
122
-
123
-
124
-
125
-
126
-
127
-
128
-
129
-
130
-
131
-
132
-
133
-
134
-
135
-
136
-
137
-
138
-
139
-
140
-
141
-
142
-
143
-
144
-
145
-
146
-
147
-
148
-
149
-
150
-
151
-
152
-
153
-
154
-
155
-
156
-
157
-
158
-
159
-
160
-
161
-
162
-
163
-
164
-
165
-
166
-
167
-
168
-
169
-
170
-
171
-
172
-
173
-
174
-
175
-
176
-
177
-
178
-
179
-
180
-
181
-
182
-
183
-
184
-
185
-
186
-
187
-
188
-
189
-
190
-
191
-
192
-
193
-
194
-
195
-
196
-
197
-
198
-
199
-
200
-
201
-
202
-
203
-
204
-
205
-
206
-
207
-
208
-
209
-
210
-
211
-
212
-
213
-
214
-
215
-
216
-
217
-
218
-
219
-
220
-
221
-
222
-
223
-
224
-
225
-
226
-
227
-
228
-
229
-
230
-
231
-
232
-
233
-
234
-
235
-
 236
236 -
 237
237 -
 238
238 -
 239
239 -
 240
240 -
 241
241 -
 242
242 -
 243
243 -
 244
244 -
 245
245
 |
 |