Sony PDX10 Operating Instructions - Page 216
Notes on VF B.L., Even if you adjust LCD COLOR and/or VF B.L., Icon/item, VCR SET, CH SELECT
 |
UPC - 027242607484
View all Sony PDX10 manuals
Add to My Manuals
Save this manual to your list of manuals |
Page 216 highlights
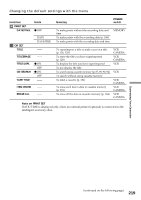
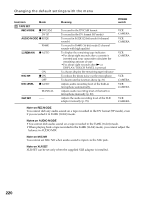
Changing the default settings with the menu Icon/item VCR SET CH SELECT Mode z CH1, CH2 AUDIO MIX CH1 CH2 -- Meaning POWER switch To play back the CHs 1/2 audios from each channel. However, if you play back the audios via the camcorder's speaker, the audios are mixed. To play back the CH1 audio from both channels 1/2 To play back the CH2 audio from both channels 1/2 To adjust the balance between the channels 1/2 (CH1/2) and channel 3/4 (CH3/4) (p. 120) VCR VCR CH1 CH3 2 4 A/VtDV OUT z OFF ON LCD/VF SET LCD COLOR -- To output digital images and sound in analog format using your camcorder To output analog images and sound in digital format using your camcorder (p. 211) VCR To adjust the color on the LCD screen, turn the SEL/PUSH EXEC dial VCR CAMERA MEMORY VF B.L. To get lowintensity To get highintensity z BRT NORMAL To set the brightness on the viewfinder screen to VCR normal CAMERA BRIGHT To brighten the viewfinder screen MEMORY GUIDEFRAME z OFF ON Does not display the guide frame. Displays the guide frame (p. 63). CAMERA MEMORY Notes on VF B.L. • When you select BRIGHT, battery life is reduced by about 10 percent during recording. • When you use power supplies other than the battery pack, BRIGHT is automatically selected. Even if you adjust LCD COLOR and/or VF B.L. The recorded picture will not be affected. 216
-
 1
1 -
2
-
3
-
4
-
5
-
6
-
7
-
8
-
9
-
10
-
11
-
12
-
13
-
14
-
15
-
16
-
17
-
18
-
19
-
20
-
21
-
22
-
23
-
24
-
25
-
26
-
27
-
28
-
29
-
30
-
31
-
32
-
33
-
34
-
35
-
36
-
37
-
38
-
39
-
40
-
41
-
42
-
43
-
44
-
45
-
46
-
47
-
48
-
49
-
50
-
51
-
52
-
53
-
54
-
55
-
56
-
57
-
58
-
59
-
60
-
61
-
62
-
63
-
64
-
65
-
66
-
67
-
68
-
69
-
70
-
71
-
72
-
73
-
74
-
75
-
76
-
77
-
78
-
79
-
80
-
81
-
82
-
83
-
84
-
85
-
86
-
87
-
88
-
89
-
90
-
91
-
92
-
93
-
94
-
95
-
96
-
97
-
98
-
99
-
100
-
101
-
102
-
103
-
104
-
105
-
106
-
107
-
108
-
109
-
110
-
111
-
112
-
113
-
114
-
115
-
116
-
117
-
118
-
119
-
120
-
121
-
122
-
123
-
124
-
125
-
126
-
127
-
128
-
129
-
130
-
131
-
132
-
133
-
134
-
135
-
136
-
137
-
138
-
139
-
140
-
141
-
142
-
143
-
144
-
145
-
146
-
147
-
148
-
149
-
150
-
151
-
152
-
153
-
154
-
155
-
156
-
157
-
158
-
159
-
160
-
161
-
162
-
163
-
164
-
165
-
166
-
167
-
168
-
169
-
170
-
171
-
172
-
173
-
174
-
175
-
176
-
177
-
178
-
179
-
180
-
181
-
182
-
183
-
184
-
185
-
186
-
187
-
188
-
189
-
190
-
191
-
192
-
193
-
194
-
195
-
196
-
197
-
198
-
199
-
200
-
201
-
202
-
203
-
204
-
205
-
206
-
207
-
208
-
209
-
210
-
 211
211 -
 212
212 -
 213
213 -
 214
214 -
 215
215 -
 216
216 -
 217
217 -
 218
218 -
 219
219 -
 220
220 -
 221
221 -
222
-
223
-
224
-
225
-
226
-
227
-
228
-
229
-
230
-
231
-
232
-
233
-
234
-
235
-
236
-
237
-
238
-
239
-
240
-
241
-
242
-
243
-
244
-
245
-
246
-
247
-
248
-
249
-
250
-
251
-
252
-
253
-
254
-
255
-
256
-
257
-
258
-
259
-
260
-
261
-
262
-
263
-
264
 |
 |
