Sony PDX10 Operating Instructions - Page 252
Quick Reference, Identifying parts and controls
 |
UPC - 027242607484
View all Sony PDX10 manuals
Add to My Manuals
Save this manual to your list of manuals |
Page 252 highlights
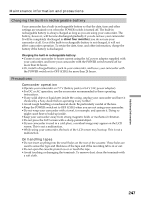
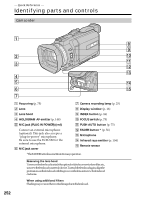
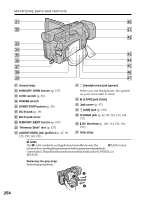
- Quick Reference - Identifying parts and controls Camcorder 1 8 9 2 0 qa 3 qs qd 4 5 qf 6 qg 7 1 Focus ring (p. 75) 7 Camera recording lamp (p. 25) 2 Lens 8 Display window (p. 16) 3 Lens hood 9 INDEX button (p. 86) 4 HOLOGRAM AF emitter (p. 148) q; FOCUS switch (p. 75) 5 MIC jack (PLUG IN POWER) (red) qa PUSH AUTO button (p. 75) Connect an external microphone (optional). This jack also accepts a "plug-in-power" microphone. Be sure to use the ECM-S80 for the external microphone. 6 MIC jack cover qs FADER button * (p. 56) qd Microphone qf Infrared rays emitter (p. 104) qg Remote sensor * The FADER button has a tactile dot for easy operation. Removing the lens hood To remove the lens hood to attach the optional wide teleconversion lens filter, etc., unscrew the lens hood counterclockwise. To attach the lens hood again, align the protrusions on the lens hood with the groove on the lens and screw the lens hood clockwise. When using additional filters Shading may occur on the recorded image due to the lens hood. 252
-
 1
1 -
2
-
3
-
4
-
5
-
6
-
7
-
8
-
9
-
10
-
11
-
12
-
13
-
14
-
15
-
16
-
17
-
18
-
19
-
20
-
21
-
22
-
23
-
24
-
25
-
26
-
27
-
28
-
29
-
30
-
31
-
32
-
33
-
34
-
35
-
36
-
37
-
38
-
39
-
40
-
41
-
42
-
43
-
44
-
45
-
46
-
47
-
48
-
49
-
50
-
51
-
52
-
53
-
54
-
55
-
56
-
57
-
58
-
59
-
60
-
61
-
62
-
63
-
64
-
65
-
66
-
67
-
68
-
69
-
70
-
71
-
72
-
73
-
74
-
75
-
76
-
77
-
78
-
79
-
80
-
81
-
82
-
83
-
84
-
85
-
86
-
87
-
88
-
89
-
90
-
91
-
92
-
93
-
94
-
95
-
96
-
97
-
98
-
99
-
100
-
101
-
102
-
103
-
104
-
105
-
106
-
107
-
108
-
109
-
110
-
111
-
112
-
113
-
114
-
115
-
116
-
117
-
118
-
119
-
120
-
121
-
122
-
123
-
124
-
125
-
126
-
127
-
128
-
129
-
130
-
131
-
132
-
133
-
134
-
135
-
136
-
137
-
138
-
139
-
140
-
141
-
142
-
143
-
144
-
145
-
146
-
147
-
148
-
149
-
150
-
151
-
152
-
153
-
154
-
155
-
156
-
157
-
158
-
159
-
160
-
161
-
162
-
163
-
164
-
165
-
166
-
167
-
168
-
169
-
170
-
171
-
172
-
173
-
174
-
175
-
176
-
177
-
178
-
179
-
180
-
181
-
182
-
183
-
184
-
185
-
186
-
187
-
188
-
189
-
190
-
191
-
192
-
193
-
194
-
195
-
196
-
197
-
198
-
199
-
200
-
201
-
202
-
203
-
204
-
205
-
206
-
207
-
208
-
209
-
210
-
211
-
212
-
213
-
214
-
215
-
216
-
217
-
218
-
219
-
220
-
221
-
222
-
223
-
224
-
225
-
226
-
227
-
228
-
229
-
230
-
231
-
232
-
233
-
234
-
235
-
236
-
237
-
238
-
239
-
240
-
241
-
242
-
243
-
244
-
245
-
246
-
 247
247 -
 248
248 -
 249
249 -
 250
250 -
 251
251 -
 252
252 -
 253
253 -
 254
254 -
 255
255 -
 256
256 -
 257
257 -
258
-
259
-
260
-
261
-
262
-
263
-
264
 |
 |
