Sony VGX-XL1A User Guide - Page 63
Representative. See VAIO Support Central., install them in the same bank.
 |
View all Sony VGX-XL1A manuals
Add to My Manuals
Save this manual to your list of manuals |
Page 63 highlights
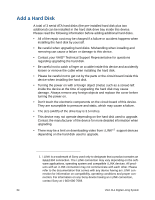
3 Remove the graphic card. Remove the cable and screw first and remove the graphic card while pressing the latch. Remove screw Press down on latch 4 Touch metal to discharge any static buildup in your body and then remove the memory module from of the package. 5 Carefully install the memory module. (Please refer to the Install Notes listed above.) If you have any problems please contact your Sony Technical Support Representative. See VAIO Support Central. • Match the memory module to the slot by paying attention to the direction of the notch as shown in the illustration below. • Insert the memory module in the slot vertically until the clips come up and secure it. • Install two memory modules as one set. There is no guarantee that it will work if only one memory module is installed. Also, use two memory modules of the same model name and same capacity and install them in the same bank. • Please be careful not to catch your finger on the cables inside this device and remove the cable when installing the memory. • The harness connector may be raised when installing the memory. Check by pressing the harness connector to make sure there is no gap. • Please be careful not to get cut on the parts or the circuit board inside this device when installing the memory. 60 VGX-XL1 Digital Living System
-
 1
1 -
2
-
3
-
4
-
5
-
6
-
7
-
8
-
9
-
10
-
11
-
12
-
13
-
14
-
15
-
16
-
17
-
18
-
19
-
20
-
21
-
22
-
23
-
24
-
25
-
26
-
27
-
28
-
29
-
30
-
31
-
32
-
33
-
34
-
35
-
36
-
37
-
38
-
39
-
40
-
41
-
42
-
43
-
44
-
45
-
46
-
47
-
48
-
49
-
50
-
51
-
52
-
53
-
54
-
55
-
56
-
57
-
 58
58 -
 59
59 -
 60
60 -
 61
61 -
 62
62 -
 63
63 -
 64
64 -
 65
65 -
 66
66 -
 67
67 -
 68
68 -
69
-
70
-
71
-
72
-
73
-
74
-
75
-
76
-
77
-
78
-
79
-
80
-
81
-
82
-
83
-
84
-
85
-
86
-
87
-
88
-
89
-
90
-
91
-
92
-
93
-
94
-
95
-
96
-
97
-
98
-
99
-
100
-
101
-
102
-
103
-
104
-
105
-
106
-
107
-
108
-
109
-
110
-
111
-
112
-
113
-
114
-
115
-
116
-
117
-
118
-
119
-
120
-
121
-
122
-
123
-
124
-
125
-
126
-
127
-
128
-
129
-
130
-
131
-
132
-
133
-
134
-
135
-
136
-
137
-
138
-
139
-
140
-
141
-
142
-
143
-
144
-
145
-
146
-
147
-
148
-
149
-
150
-
151
-
152
-
153
-
154
-
155
-
156
-
157
-
158
-
159
-
160
-
161
-
162
-
163
-
164
-
165
-
166
-
167
-
168
-
169
-
170
-
171
-
172
-
173
-
174
-
175
 |
 |
