Sony VGX-XL1A User Guide - Page 85
Network name SSID, Wireless Network Connections
 |
View all Sony VGX-XL1A manuals
Add to My Manuals
Save this manual to your list of manuals |
Page 85 highlights
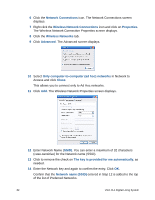
6 Click the Network Connections icon. The Network Connections screen displays. 7 Right click the Wireless Network Connections icon and click on Properties. The Wireless Network Connection Properties screen displays. 8 Click the Wireless Networks tab. 9 Click Advanced. The Advanced screen displays. 10 Select Only computer-to-computer (ad hoc) networks in Network to Access and click Close. This allows you to connect only to Ad Hoc networks. 11 Click Add. The Wireless Network Properties screen displays. 12 Enter Network Name (SSID). You can enter a maximum of 32 characters (case-sensitive) for the Network name (SSID). 13 Click to remove the check on The key is provided for me automatically, as needed. 14 Enter the Network key and again to confirm the entry. Click OK. Confirm that the Network name (SSID) entered in Step 12 is added to the top of the list of Preferred Networks. 82 VGX-XL1 Digital Living System
-
 1
1 -
2
-
3
-
4
-
5
-
6
-
7
-
8
-
9
-
10
-
11
-
12
-
13
-
14
-
15
-
16
-
17
-
18
-
19
-
20
-
21
-
22
-
23
-
24
-
25
-
26
-
27
-
28
-
29
-
30
-
31
-
32
-
33
-
34
-
35
-
36
-
37
-
38
-
39
-
40
-
41
-
42
-
43
-
44
-
45
-
46
-
47
-
48
-
49
-
50
-
51
-
52
-
53
-
54
-
55
-
56
-
57
-
58
-
59
-
60
-
61
-
62
-
63
-
64
-
65
-
66
-
67
-
68
-
69
-
70
-
71
-
72
-
73
-
74
-
75
-
76
-
77
-
78
-
79
-
 80
80 -
 81
81 -
 82
82 -
 83
83 -
 84
84 -
 85
85 -
 86
86 -
 87
87 -
 88
88 -
 89
89 -
 90
90 -
91
-
92
-
93
-
94
-
95
-
96
-
97
-
98
-
99
-
100
-
101
-
102
-
103
-
104
-
105
-
106
-
107
-
108
-
109
-
110
-
111
-
112
-
113
-
114
-
115
-
116
-
117
-
118
-
119
-
120
-
121
-
122
-
123
-
124
-
125
-
126
-
127
-
128
-
129
-
130
-
131
-
132
-
133
-
134
-
135
-
136
-
137
-
138
-
139
-
140
-
141
-
142
-
143
-
144
-
145
-
146
-
147
-
148
-
149
-
150
-
151
-
152
-
153
-
154
-
155
-
156
-
157
-
158
-
159
-
160
-
161
-
162
-
163
-
164
-
165
-
166
-
167
-
168
-
169
-
170
-
171
-
172
-
173
-
174
-
175
 |
 |
