Stihl SR 450 Product Instruction Manual - Page 14
Assembling the Unit - accessories
 |
View all Stihl SR 450 manuals
Add to My Manuals
Save this manual to your list of manuals |
Page 14 highlights
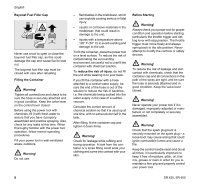
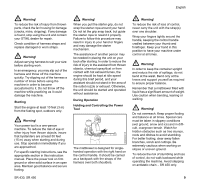
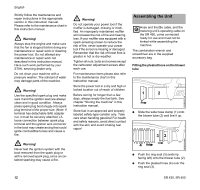
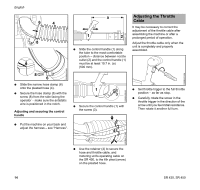
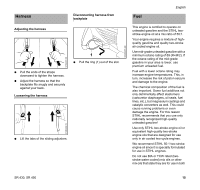
English Strictly follow the maintenance and repair instructions in the appropriate section in this instruction manual. Please refer to the maintenance chart in this instruction manual. Warning! Always stop the engine and make sure that the fan is stopped before doing any maintenance or repair work or cleaning the power tool. Do not attempt any maintenance or repair work not described in this instruction manual. Have such work performed by your STIHL servicing dealer only. Do not clean your machine with a pressure washer. The solid jet of water may damage parts of the machine. Warning! Use the specified spark plug and make sure it and the ignition lead are always clean and in good condition. Always press spark plug boot snugly onto spark plug terminal of the proper size. (Note: If terminal has detachable SAE adapter nut, it must be securely attached.) A loose connection between spark plug terminal and the ignition wire connector in the boot may create arcing that could ignite combustible fumes and cause a fire. Warning! Do not operate your power tool if the muffler is damaged, missing or modified. An improperly maintained muffler will increase the risk of fire and hearing loss. If your muffler was equipped with a spark-arresting screen to reduce the risk of fire, never operate your power tool if the screen is missing or damaged. Remember that the risk of forest fires is greater in hot or dry weather. Tighten all nuts, bolts and screws except the carburetor adjustment screws after each use. For maintenance items please also refer to the maintenance chart in this instruction manual. Store the power tool in a dry and high or locked location out of reach of children. Before storing for longer than a few days, always empty the fuel tank. See chapter "Storing the machine" in this instruction manual. Store fuel in an approved and properly labeled safety-type canister only. Take care when handling gasoline! For health and safety reasons, avoid direct contact with the skin and avoid inhaling fuel vapor! Assembling the Unit Hose and throttle cable, and the metering unit's operating cable on the SR 450, come connected ready for use and must not be kinked while assembling the machine. The combination wrench and screwdriver are in the supplied accessory bag. Fitting the pleated hose on the blower tube 1 2 N Slide the wide hose clamp (1) onto the blower tube (2) and line it up. 32 0002BA003 KN 0002BA004 KN Warning! Never test the ignition system with the boot removed from the spark plug or with a removed spark plug, since uncontained sparking may cause a fire. 4 N Push the ring seal (3) (wide lip facing left) onto the blower tube (2). N Push the pleated hose (4) over the ring seal (3). 12 SR 430, SR 450
-
 1
1 -
2
-
3
-
4
-
5
-
6
-
7
-
8
-
 9
9 -
 10
10 -
 11
11 -
 12
12 -
 13
13 -
 14
14 -
 15
15 -
 16
16 -
 17
17 -
 18
18 -
 19
19 -
20
-
21
-
22
-
23
-
24
-
25
-
26
-
27
-
28
-
29
-
30
-
31
-
32
-
33
-
34
-
35
-
36
-
37
-
38
-
39
-
40
-
41
-
42
-
43
-
44
-
45
-
46
-
47
-
48
-
49
-
50
-
51
-
52
-
53
-
54
-
55
-
56
-
57
-
58
-
59
-
60
-
61
-
62
-
63
-
64
-
65
-
66
-
67
-
68
-
69
-
70
-
71
-
72
-
73
-
74
-
75
-
76
-
77
-
78
-
79
-
80
-
81
-
82
-
83
-
84
-
85
-
86
-
87
-
88
-
89
-
90
-
91
-
92
-
93
-
94
-
95
-
96
-
97
-
98
-
99
-
100
 |
 |