TASCAM DM-24 Installation and Use v 2.0 Manual Addendum - Page 10
Direct out post-ADC
 |
View all TASCAM DM-24 manuals
Add to My Manuals
Save this manual to your list of manuals |
Page 10 highlights
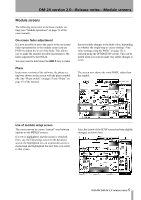
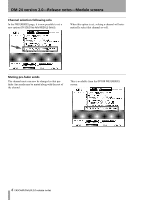
DM-24 version 2.0-Release notes-I/O setup changes 1 Navigate to the bottom line of the screen, and select the appropriate effect return or assignable return. 2 Next, use POD 4 to select the ST button, and then press ENTER. Direct out post-ADC This new option allows the direct output signal to be immediately post the A-D converter. Press the OPTIONS key and select the PREFERENCES screen: The Direct Out Mode:Post ADC option allows you to set the pick-off point after the A-D converter. An example of where this might be particularly useful is when you are making a live recording. If a microphone is plugged into mic input 1, and you have selected the post ADC option you can split the recording and the live mix of this signal in the following way: Press channel 1's SEL key, followed by the on-screen DIRECT OUT button for channel 1. This sends the postADC direct out signal to the multitrack recorder (assuming that all the patching, etc. is configured appropriately). For the live mix, channel 1 is set as an input fed by M/L 1, and assigned to the stereo buss. Now whatever changes you make to the channel do not affect what goes to multitrack. Obviously, the signal feeding the multitrack is dry, and if you want to use any effects such as compressor, reverb, etc. while recording, you will have to use an analog insert loop. This feature is also useful in the studio, where the post ADC direct outputs can feed the multitrack, and the tape return signals return to the channels, which are set as returns, rather than as inputs. This saves the use of Aux 1-2 as a tape return path, and frees up the aux sends for use as multiple cue mixes and effect sends. 10 TASCAM DM-24 2.0 release notes
-
 1
1 -
2
-
3
-
4
-
 5
5 -
 6
6 -
 7
7 -
 8
8 -
 9
9 -
 10
10 -
 11
11 -
 12
12 -
 13
13 -
 14
14 -
 15
15 -
16
-
17
-
18
-
19
-
20
-
21
-
22
-
23
-
24
-
25
-
26
-
27
-
28
 |
 |
