TP-Link Archer VR2800v Archer VR2800vDE V1 User Guide - Page 10
Back Panel, Description
 |
View all TP-Link Archer VR2800v manuals
Add to My Manuals
Save this manual to your list of manuals |
Page 10 highlights
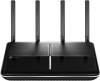
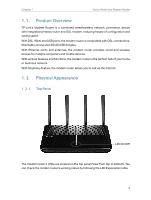
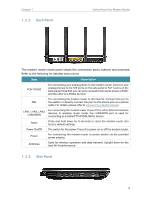
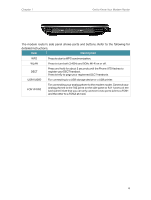
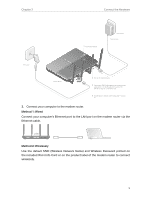
Chapter 1 1. 2. 2. Back Panel Get to Know Your Modem Router The modem router's back panel shows the connection ports, buttons and antennas. Refer to the following for detailed instructions. Item Description FON1/FON2 For connecting your analog phone to the modem router. Connect your analog phones to the TAE ports on the side panel or RJ11 ports on the back panel. Note that you can only connect to two ports (one to a FON1 and the other to a FON2) at most. For connecting the modem router to the internet. Connect the port to DSL the splitter or directly connect the port to the phone jack via a phone cable. For details, please refer to Connect Your Modem Router. LAN1, LAN2, LAN3, LAN4/WAN For connecting the modem router to your PC or other Ethernet network devices. In wireless router mode, the LAN4/WAN port is used for connecting to a Cable/FTTH/VDSL/ADSL device. Reset Press and hold down for 8 seconds to reset the modem router into factory default settings. Power On/Off The switch for the power. Press it to power on or off the modem router. Power For connecting the modem router to power socket via the provided power adapter. Antennas Used for wireless operation and data transmit. Upright them for the best Wi-Fi performance. 1. 2. 3. Side Panel 5
-
 1
1 -
2
-
3
-
4
-
 5
5 -
 6
6 -
 7
7 -
 8
8 -
 9
9 -
 10
10 -
 11
11 -
 12
12 -
 13
13 -
 14
14 -
 15
15 -
16
-
17
-
18
-
19
-
20
-
21
-
22
-
23
-
24
-
25
-
26
-
27
-
28
-
29
-
30
-
31
-
32
-
33
-
34
-
35
-
36
-
37
-
38
-
39
-
40
-
41
-
42
-
43
-
44
-
45
-
46
-
47
-
48
-
49
-
50
-
51
-
52
-
53
-
54
-
55
-
56
-
57
-
58
-
59
-
60
-
61
-
62
-
63
-
64
-
65
-
66
-
67
-
68
-
69
-
70
-
71
-
72
-
73
-
74
-
75
-
76
-
77
-
78
-
79
-
80
-
81
-
82
-
83
-
84
-
85
-
86
-
87
-
88
-
89
-
90
-
91
-
92
-
93
-
94
-
95
-
96
-
97
-
98
-
99
-
100
-
101
-
102
-
103
-
104
-
105
-
106
-
107
-
108
-
109
-
110
-
111
-
112
-
113
-
114
-
115
-
116
-
117
-
118
-
119
-
120
-
121
-
122
-
123
-
124
-
125
-
126
-
127
-
128
-
129
-
130
-
131
-
132
-
133
-
134
-
135
-
136
-
137
-
138
-
139
-
140
-
141
 |
 |
