TP-Link Archer VR2800v Archer VR2800vDE V1 User Guide - Page 98
column, Enter Site B's WAN IP address., of Site A.
 |
View all TP-Link Archer VR2800v manuals
Add to My Manuals
Save this manual to your list of manuals |
Page 98 highlights
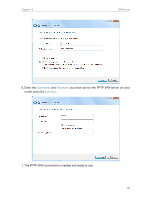
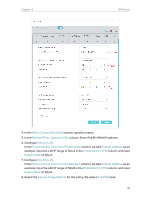
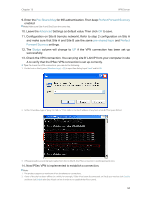
Chapter 13 VPN Server 4. In the IPSec Connection Name column, specify a name. 5. In the Remote IPSec Gateway (URL) column, Enter Site B's WAN IP address. 6. Configure Site A's LAN. In the Tunnel access from local IP addresses column, we take Subnet Address as an example. Input the LAN IP range of Site A in the IP Address for VPN column, and input Subnet Mask of Site A. 7. Configure Site B's LAN. In the Tunnel access from local IP addresses column, we take Subnet Address as an example. Input the LAN IP range of Site B in the IP Address for VPN column, and input Subnet Mask of Site B. 8. Select the Key Exchange Method for the policy. We select Auto(IKE) here. 93
-
 1
1 -
2
-
3
-
4
-
5
-
6
-
7
-
8
-
9
-
10
-
11
-
12
-
13
-
14
-
15
-
16
-
17
-
18
-
19
-
20
-
21
-
22
-
23
-
24
-
25
-
26
-
27
-
28
-
29
-
30
-
31
-
32
-
33
-
34
-
35
-
36
-
37
-
38
-
39
-
40
-
41
-
42
-
43
-
44
-
45
-
46
-
47
-
48
-
49
-
50
-
51
-
52
-
53
-
54
-
55
-
56
-
57
-
58
-
59
-
60
-
61
-
62
-
63
-
64
-
65
-
66
-
67
-
68
-
69
-
70
-
71
-
72
-
73
-
74
-
75
-
76
-
77
-
78
-
79
-
80
-
81
-
82
-
83
-
84
-
85
-
86
-
87
-
88
-
89
-
90
-
91
-
92
-
 93
93 -
 94
94 -
 95
95 -
 96
96 -
 97
97 -
 98
98 -
 99
99 -
 100
100 -
 101
101 -
 102
102 -
 103
103 -
104
-
105
-
106
-
107
-
108
-
109
-
110
-
111
-
112
-
113
-
114
-
115
-
116
-
117
-
118
-
119
-
120
-
121
-
122
-
123
-
124
-
125
-
126
-
127
-
128
-
129
-
130
-
131
-
132
-
133
-
134
-
135
-
136
-
137
-
138
-
139
-
140
-
141
 |
 |

93
Chapter 13
VPN Server
4. In the
IPSec Connection Name
column, specify a name.
5. In the
Remote IPSec Gateway (URL)
column, Enter Site B’s WAN IP address.
6. Configure
Site A’s LAN
.
In the
Tunnel access from local IP addresses
column, we take
Subnet Address
as an
example. Input the LAN IP range of Site A in the
IP Address for VPN
column, and input
Subnet Mask
of Site A.
7. Configure
Site B’s LAN
.
In the
Tunnel access from local IP addresses
column, we take
Subnet Address
as an
example. Input the LAN IP range of Site B in the
IP Address for VPN
column, and input
Subnet Mask
of Site B.
8. Select the
Key Exchange Method
for the policy. We select
Auto(IKE)
here.