TP-Link T2600G-52TS TL-SG3452 T2600G-52TS V1 User Guide - Page 85
Port Enable
 |
View all TP-Link T2600G-52TS TL-SG3452 manuals
Add to My Manuals
Save this manual to your list of manuals |
Page 85 highlights
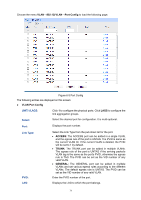
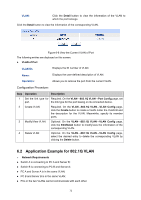
Operation: Click the Edit button to modify the settings of the entry. And click the Modify button to apply your settings. 6.3.2 Port Enable On this page, you can enable the port for the MAC VLAN feature. Only the port is enabled, can the configured MAC VLAN take effect. Choose the menu VLAN→MAC VLAN→Port Enable to load the following page. UNIT: Figure 6-8 Enable Port for MAC VLAN Click 1 to configure the physical ports. Click LAGS to configure the link aggregation groups. Select your desired port for MAC VLAN function. All the ports are disabled for MAC VLAN function by default. Configuration Procedure: Step Operation Description 1 Set the link type for Required. On the VLAN→802.1Q VLAN→Port Config page, set port. the link type for the port basing on its connected device. 2 Create VLAN. Required. On the VLAN→802.1Q VLAN→VLAN Config page, click the Create button to create a VLAN. Enter the VLAN ID and the description for the VLAN. Meanwhile, specify its member ports. 3 Create MAC VLAN. Required. On the VLAN→MAC VLAN page, create the MAC VLAN. For the device in a MAC VLAN, it's required to set its connected port of switch to be a member of this VLAN so as to ensure the normal communication. 4 Select your desired Required. On the VLAN→MAC VLAN→Port Enable page, select ports for MAC VLAN and enable the desired ports for MAC VLAN feature. feature. 6.4 Application Example for MAC VLAN Network Requirements Switch A and switch B are connected to meeting room A and meeting room B respectively, and the two rooms are for all departments; Notebook A and Notebook B, special for meeting room, are of two different departments; 75
-
 1
1 -
2
-
3
-
4
-
5
-
6
-
7
-
8
-
9
-
10
-
11
-
12
-
13
-
14
-
15
-
16
-
17
-
18
-
19
-
20
-
21
-
22
-
23
-
24
-
25
-
26
-
27
-
28
-
29
-
30
-
31
-
32
-
33
-
34
-
35
-
36
-
37
-
38
-
39
-
40
-
41
-
42
-
43
-
44
-
45
-
46
-
47
-
48
-
49
-
50
-
51
-
52
-
53
-
54
-
55
-
56
-
57
-
58
-
59
-
60
-
61
-
62
-
63
-
64
-
65
-
66
-
67
-
68
-
69
-
70
-
71
-
72
-
73
-
74
-
75
-
76
-
77
-
78
-
79
-
 80
80 -
 81
81 -
 82
82 -
 83
83 -
 84
84 -
 85
85 -
 86
86 -
 87
87 -
 88
88 -
 89
89 -
 90
90 -
91
-
92
-
93
-
94
-
95
-
96
-
97
-
98
-
99
-
100
-
101
-
102
-
103
-
104
-
105
-
106
-
107
-
108
-
109
-
110
-
111
-
112
-
113
-
114
-
115
-
116
-
117
-
118
-
119
-
120
-
121
-
122
-
123
-
124
-
125
-
126
-
127
-
128
-
129
-
130
-
131
-
132
-
133
-
134
-
135
-
136
-
137
-
138
-
139
-
140
-
141
-
142
-
143
-
144
-
145
-
146
-
147
-
148
-
149
-
150
-
151
-
152
-
153
-
154
-
155
-
156
-
157
-
158
-
159
-
160
-
161
-
162
-
163
-
164
-
165
-
166
-
167
-
168
-
169
-
170
-
171
-
172
-
173
-
174
-
175
-
176
-
177
-
178
-
179
-
180
-
181
-
182
-
183
-
184
-
185
-
186
-
187
-
188
-
189
-
190
-
191
-
192
-
193
-
194
-
195
-
196
-
197
-
198
-
199
-
200
-
201
-
202
-
203
-
204
-
205
-
206
-
207
-
208
-
209
-
210
-
211
-
212
-
213
-
214
-
215
-
216
-
217
-
218
-
219
-
220
-
221
-
222
-
223
-
224
-
225
-
226
-
227
-
228
-
229
-
230
-
231
-
232
-
233
-
234
-
235
-
236
-
237
-
238
-
239
-
240
-
241
-
242
-
243
-
244
-
245
-
246
-
247
-
248
-
249
-
250
-
251
-
252
-
253
-
254
-
255
-
256
-
257
-
258
-
259
-
260
-
261
-
262
-
263
-
264
-
265
-
266
-
267
-
268
-
269
-
270
-
271
-
272
-
273
-
274
-
275
-
276
-
277
-
278
 |
 |
