TP-Link TL-SG3210 TL-SG3210 V1 User Guide - Page 21
Current System Date, Current Time Source, Manual, Get GMT, Synchronize, PC'S Clock, DST Status,
 |
View all TP-Link TL-SG3210 manuals
Add to My Manuals
Save this manual to your list of manuals |
Page 21 highlights
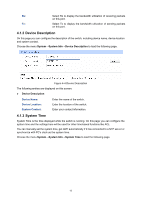
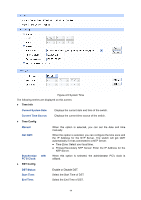
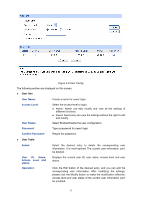
Figure 4-5 System Time The following entries are displayed on this screen: ¾ Time Info Current System Date: Displays the current date and time of the switch. Current Time Source: Displays the current time source of the switch. ¾ Time Config Manual: Get GMT: Synchronize with PC'S Clock: When this option is selected, you can set the date and time manually. When this option is selected, you can configure the time zone and the IP Address for the NTP Server. The switch will get GMT automatically if it has connected to a NTP Server. z Time Zone: Select your local time. z Primary/Secondary NTP Server: Enter the IP Address for the NTP Server. When this option is selected, the administrator PC's clock is utilized. ¾ DST Config DST Status: Start Time: End Time: Enable or Disable DST. Select the Start Time of DST. Select the End Time of DST. 14
-
 1
1 -
2
-
3
-
4
-
5
-
6
-
7
-
8
-
9
-
10
-
11
-
12
-
13
-
14
-
15
-
 16
16 -
 17
17 -
 18
18 -
 19
19 -
 20
20 -
 21
21 -
 22
22 -
 23
23 -
 24
24 -
 25
25 -
 26
26 -
27
-
28
-
29
-
30
-
31
-
32
-
33
-
34
-
35
-
36
-
37
-
38
-
39
-
40
-
41
-
42
-
43
-
44
-
45
-
46
-
47
-
48
-
49
-
50
-
51
-
52
-
53
-
54
-
55
-
56
-
57
-
58
-
59
-
60
-
61
-
62
-
63
-
64
-
65
-
66
-
67
-
68
-
69
-
70
-
71
-
72
-
73
-
74
-
75
-
76
-
77
-
78
-
79
-
80
-
81
-
82
-
83
-
84
-
85
-
86
-
87
-
88
-
89
-
90
-
91
-
92
-
93
-
94
-
95
-
96
-
97
-
98
-
99
-
100
-
101
-
102
-
103
-
104
-
105
-
106
-
107
-
108
-
109
-
110
-
111
-
112
-
113
-
114
-
115
-
116
-
117
-
118
-
119
-
120
-
121
-
122
-
123
-
124
-
125
-
126
-
127
-
128
-
129
-
130
-
131
-
132
-
133
-
134
-
135
-
136
-
137
-
138
-
139
-
140
-
141
-
142
-
143
-
144
-
145
-
146
-
147
-
148
-
149
-
150
-
151
-
152
-
153
-
154
-
155
-
156
-
157
-
158
-
159
-
160
-
161
-
162
-
163
-
164
-
165
-
166
-
167
-
168
-
169
-
170
-
171
-
172
-
173
-
174
-
175
-
176
-
177
-
178
-
179
-
180
-
181
-
182
-
183
-
184
-
185
-
186
-
187
-
188
-
189
-
190
-
191
-
192
-
193
-
194
-
195
-
196
-
197
-
198
-
199
-
200
-
201
-
202
-
203
-
204
-
205
-
206
-
207
-
208
-
209
-
210
-
211
-
212
-
213
-
214
-
215
-
216
-
217
-
218
-
219
-
220
-
221
-
222
-
223
-
224
-
225
-
226
-
227
-
228
-
229
-
230
-
231
 |
 |
