TP-Link TL-WPA9610 KIT TL-WPA9610 KITEU V1 User Guide - Page 17
Change Powerline Network Name, 3. 3. Wi-Fi Move
 |
View all TP-Link TL-WPA9610 KIT manuals
Add to My Manuals
Save this manual to your list of manuals |
Page 17 highlights
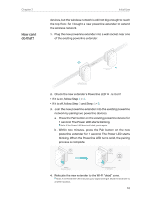
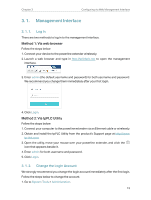
Chapter 3 Configuring via Web Management Interface 3. Click the add icon and enter the Powerline Key of the device you want to add. The Powerline Key contains 16 capital letters, formed like XXXX-XXXX-XXXX-XXXX. It is printed on the back of the powerline device. 4. Click Add to add the device. 3. 2. 2. Change Powerline Network Name You can change the extender's powerline network name to add it to or remove it from a powerline network. Follow the steps below to change the name. 1. Connect to the powerline extender wirelessly. Visit http://tplinkplc.net, and log in with the username and password you set for the extender. 2. Go to Device Settings > Powerline. 3. Change the Network Name. You can also click Default to use the default network name, e.g. HomePlugAV. However, if the default name is used, the Wi-Fi Move function will be automatically disabled. 4. Click Save to make the settings effective. 3. 3. Wi-Fi Move Wi-Fi Move is enabled by default. With the feature enabled, any changes made to the settings of one powerline extender will be automatically synchronized to other powerline extenders whose Wi-Fi Move feature is also enabled on the same powerline network . 15
-
 1
1 -
2
-
3
-
4
-
5
-
6
-
7
-
8
-
9
-
10
-
11
-
 12
12 -
 13
13 -
 14
14 -
 15
15 -
 16
16 -
 17
17 -
 18
18 -
 19
19 -
 20
20 -
 21
21 -
 22
22 -
23
-
24
-
25
-
26
-
27
-
28
-
29
-
30
-
31
-
32
-
33
-
34
-
35
-
36
-
37
-
38
-
39
-
40
 |
 |
